2021.09.27
Highlight for this release is Animation Capture.
- ADDED Animation Capture AnimCap, a.k.a. Reverse Motion Capture
- ADDED Self-Collision Overlapping shapes, begone
- ADDED Lollipop Controls Clarity where there was none
- IMPROVED Quality of Life Less clutter, more joy
- IMPROVED No Graph Editor Mess Clean Graph Editor, clean mind
- IMPROVED No More Cycles Clean Graph Editor, clean mind
- IMPROVED No Initial State Less is more
- FIXED Multiple Floating Licences Now behaves as one would expect
Showcase
Let's start with some eye-candy, thanks to Jason Snyman for the gorilla rig! :)
Introduction
Lighter, faster, stronger. This release introduces a new way of thinking about physics, and is part ¼.
| # | Release | Date | Description |
|---|---|---|---|
| 1 | Workflow | Today | At least 100% faster, but primarily much easier to work with |
| 2 | Render Performance | The current bottleneck, expect a 50-100x boost | |
| 3 | Recording Performance | Currently written in Python, to be written in optimised C++ | |
| 4 | Interactive Tools | No more fiddling with offsets in the channel box, viewport manipulators galore! |
Something amazing has happened.

Since release only a few weeks ago, Ragdoll is now used in production across the globe in over a dozen countries at the most major of studios, several dozens of mid-sized studios wanting to gain an advantage and hundreds of independent animators and riggers alike.
And that is amazing, it is. But something even more amazing has happened; Ragdoll has leaped forward. And that will be what the next 4-part release is about.
See, since launch I've had conversations with animators using Ragdoll for the very first time. One of those animators made a request that at first glance didn't look like much.
Quote
"I don't like working with green channels, as it is not ideal for animating. Is there a way to I can overcome this?" - Christopher Page
Here's what he was referring to.
Notice how the nodes with physics applied got green channels? The reason they are green is because Ragdoll is driving them. They are green rather than yellow because you can still edit them, at the same time as Ragdoll is editing them. Your changes will be reflected in the simulation, this is how you control the simulation as it is running.
Can we get rid of that connection? Well.. No? This is Ragdoll's connection to your controls. Without those.. there is no physics.
I quickly dismissed the idea and carried on with my day.. But then something clicked.. What if..?
In the next section, I'll dive into how this works and why this change goes far beyond just getting rid of green channels.
Benefits at a glance
- ✔️ 10,000% greater performance (or more!)
- ✔️ No more graph editor mess
- ✔️ No more initial state
- ✔️ No more cycles
- ✔️ No more clutter in the Outliner
- ✔️ No more clutter in the Viewport
- ✔️ Support for interactive scale
- ✔️ Support for overlapping shapes
- ✔️ Support for IK/FK
- ✔️ Support for space switching
- ✔️ Support for follicles
- ✔️ Support for native Maya constraints
- ✔️ Support for ...
From here, this list has no end, because anything capable of affecting the worldspace position and orientation of your controls is natively supported with this workflow. Anything.
I'm a techy, gimme the deets
The reason this works is because Ragdoll will consider the .worldMatrix attribute of any control and this is the same attribute Maya itself uses for just about anything.
Animation Capture
Inspired by Motion Capture - Animation Capture is a new way to think about and work with physics in Maya. To learn about it, let's first understand how Motion Capture generally works.

Here is a typical data pipeline for motion capture, from real-life actor to final character animation.
| # | Description |
|---|---|
| 1 | Markers are attached to an actor |
| 2 | Markers are "captured" |
| 3 | A pointcloud is generated |
| 4 | A hierarchy of joints is generated |
| 5 | Joints drive a typical character rig |
| 6 | Rig drives final geometry for render |
Each "marker" is a dud. Nothing of any complexity. Something for the camera(s) to recognise and track as it moves through space. Once tracked, it's able to translate this marker from a 2D image into a 3D position, and continues to do so for each marker, for the real processing to take place inside software.
Once the capture is complete, the human actor can remove the markers and go enjoy the rest of their day. The rest is up to the computer.
With 3D positions generated, software takes over to translate these points into a hierarchy; the FK joint hierarchy you may be familiar with if you've ever worked with mocap. The joint hierarchy can then be used to either drive the final geometry, or to drive a more complex character rig which in turn drives the final geometry.
Animation Capture is just like that, but in reverse. Instead of capturing a person, it captures your character rig.

| # | Description |
|---|---|
| 1 | Markers are attached to a character rig |
| 2 | Markers are "captured" |
| 3 | A rigid is generated for each marker |
| 4 | A hierarchy of constraints is generated |
| 5 | Simulation is recorded back onto the original character rig |
Unlike motion capture, we'd like the result mapped back onto our character rig again, which is how animators iterate with physics.
Demo 1 - Basics
Ok, enough prelude, let's dive in.
Before
Here's what life was like before, with Active Rigid.
After
And here's life with Markers.
Notice how the channels are left alone?
This is the key difference between Marker and Rigid. Although you still provide Ragdoll with controls, Ragdoll no longer drives your controls directly. Instead, it shows you what they would look like if they were driven with physics.
Once you're happy with what you see, you Record.
Demo 2 - Ragdoll
Let's have a look at how Markers work with a full ragdoll.
1. Setup hierarchy
The first step is nothing new, you've seen it before.
2. Edit shapes
This too, it's second nature by now.
Except!
Notice how the shapes overlap? That's ok! No longer will you have to worry about self-intersecting shapes. Unless you want it to, with the new Self Collide attribute. :D I'll touch on this a bit more below, under #self-collide
Double Except!
Release 4/4 in this series will deal with the channel box, and make editing these values interactive in the viewport for a superior experience and a lot less clicks and fiddling with numbers.
3. Animate
Now things are getting interesting. To keep our viewport clean, we can offset the simulation slightly. The offset is purely visual and won't affect the simulation or subsequent recording.
4. Record
Finally, and this is what separates Markers from Rigids, we record our simulation back onto our controls.
Demo 3 - Inverse Kinematics
That last example was contrived. No rig is without IK, so how does Markers work here?
1. No IK
Since we put markers on the FK controls, Ragdoll doesn't know about what the IK controls are doing.
2. Reassign
So let's put markers on the joints driven by both IK and FK, such that when you switch between the two, Ragdoll knows how to follow along. So let's Reassign.
3. Retarget
But recording still targets our original FK controls, and what we want is to record our IK controls. So we can Retarget.
4. Record Translation
Unlike FK, IK isn't just rotation, but translation too. So let's tell Ragdoll to record the translation from these markers too.
And there you have it! This works with IK, SpineIK, Follicles, Geometry Constraints; anything you can throw at it.
Demo 4 - Real World Example
Here's a work-in-progress animation from Christopher Page (thanks for lending it to me!) Let's see how we can use Ragdoll to help improve upon it.
1. The Problem
Notice how the elbow intersects the table as he moves his torso around? A difficult problem and moving target as you need to keep tweaking both the torso and hand IK handle to tune your animation.
2. Isolate Timeline
Since this animation is over 600 frames, we'll isolate our work to a small portion of it. For both performance and cleanliness; Ragdoll will only record onto the current timeline (or selected portion of it).
3. Assign Markers
Like before, we'll assign markers to the underlying skeleton to respect what the IK solver does. We'll also make the hand Kinematic to respect the original animation exactly. The clavicle is also Kinematic per default, as it was the first assigned control - and is thus the "root" of our dynamic hierarchy.
4. Include Table
Since we're interacting with the table, we'll include this too. Also Kinematic, no dynamics will be affecting it, and also as a Box shape to speed up and improve the stability of the simulation.
5. Tune Shapes
Next we'll isolate contacts with just the elbow area, to respect the hand and lower arm animation.
6. Tune Material
In this case, we'd like for the elbow to slide across the table, no friction.
More Realism?
In the real world, there would be friction and it could come in handy here too. But what should we expect from the elbow rubbing against the table? We should include the torso for this as well, which you absolutely can (and maybe should!). But to keep things simple, we'll let the clavicle preserve it's original animation exactly.
7. Retargeting
Ragdoll will record onto the nodes you originally assign, but like before we want recording to go elsewhere; from joints to IK controls.
8. Record Translation
Likewise, we'd also like translation included. And we don't care for the shoulder and clavicle animation; all we want is the IK handle and Pole Vector.
9. Record Simulation
We're all set! Let's hit Record!
10. Before And After
And there we go! 2 minutes or less, and you've got a reusable setup for correcting the elbow whenever the animation changes. IK is intact and you can keep working with keyframes. Keeping Ragdoll attached to your rig has zero impact on performance (as you can see by looking at the fps counter near the bottom of the two comparisons), and once hidden it has no impact on your Outliner either. All clean!
Here's one more I couldn't find room for, an earlier version of the animation with stepped keys and finger simulation. Look at all that juicy finger interaction with the table. 😊
Rig and Model courtesy of Ramon Arango - Apollo Rig
New Menu
Let's take a moment to reflect on what we've just seen. There are 3 new nodes in Ragdoll.
| # | Node | Description |
|---|---|---|
rdSolver |
The "camera" that monitors "Markers" and performs all heavy-lifting. | |
rdMarker |
A tracking marker, something to monitor an individual control. | |
rdGroup |
A collection of markers, with high-level control over many markers. |
Here's the new menu. If all goes well, it will completely replace the Active Rigid and Active Chain menu items, along with Controls including Mimic. All of those things are made possible in a much easier and performant way using Markers.

The most important elements are at the top.
| # | Item | Description |
|---|---|---|
Assign Single |
Monitor a single object in the Maya scene. Use this for props, environment and other free-falling things. | |
Assign Group |
Monitor a series of connected objects, like a limb. | |
Record |
Transfer simulation to marked objects |
Like Active Chain, the order of selection determines the order in which markers assume your objects are connected. And adding more markers to a group is done by starting your selection from any point in an existing group and working your way outwards. Just like Active Chain.
Limitations
You currently cannot create multiple rdSolver nodes, but can work around it by importing one from another Maya scene file.
The Guide Space is somewhat complicated. The group has one too that affects all markers, and per default it's set to -1 for Localspace. The benefit is that you can quickly change the space for all markers by changing this one attribute. The downside is that if you want to change it for just one marker, you first need to reset this attribute to 0.
These will be addressed in the upcoming few releases.
Recording
Markers can be recorded all together, or independently. For example, say you wanted animation from frame 1-100, simulate 101-150 and return to animation from 151-200. You can do that.
Furthermore, say you liked what the simulation was doing, but only on one half of the body. Or only on the hip, driving the main trajectory in a physically-plausible way. Keeping the rest of your animation intact.
Record All
With nothing selected, Ragdoll will record all marked controls to the current Maya playback range.
Record Selected Markers
Select a few controls to control what gets recorded.
Record Range
Limit the Maya playback range for control over when recording takes place.
Record Selected Range
Or, select an explicit range interactively.
Intelligent Range
A Kinematic marker is entirely animated, so there's no need to actually record those. Ragdoll will ensure only non-kinematic frames are recorded, so you can do things like this.
Record to Animation Layer
Ragdoll will record to whichever layer is currently active.
Input Type
In the above examples, I mentioned Kinematic and you probably spotted a few other options too, like Inherit and Guide. What are those?
The Input Type is how Ragdoll should interpret the controls you assign. Did you mean for them remain animated, i.e. Kinematic? Or should they follow the control around, i.e. Guide? Or should they just fall with gravity, ignoring the original control altogether, i.e. Off?
The Input Type can be set either for a whole group of markers, or each marker individually.
| Type | Description |
|---|---|
| Inherit | Do whatever the group is doing, or Kinematic if there is no group |
| Off | Do nothing, just fall under gravity |
| Kinematic | Follow the input exactly, physics need not apply |
| Guide | Follow the input approximately, with some Stiffness and Damping |
Off
Treat the input as a starting position, but nothing else.
Kinematic
Follow the input exactly, no exceptions. Not even collisions.
Guide Space -1
Follow the local angles of the input.
Guide Space +1
Follow the world position and orientation of the input.
Retarget
We've talked a lot about "retargeting". But what is that?
Per default, markers are recorded onto the controls you assigned, this is called Rig to Rig.

But often times, rigs are more complicated and what you want is for the simulation to look at one set of nodes, but record onto another. This is called Joint to Rig, but can be from any source. Even other controls (like FK to IK).

The Old Days
Think about how you would accomplish this using the Active Rigid or Active Chain commands. That would be a huge pain, but not with markers!
Reassign
Over in Demo 2 - Ragdoll we "reassigned" already marked controls. What does that mean?
In that example, we've assigned our FK controls directly, which means Ragdoll would grab the translation and rotation from those controls during simulation. But what we really wanted was the IK controls.
But! We couldn't just assign to the IK controls directly, since they are indirectly rotating a characters limbs. So instead, we Reassign the markers previously made onto the underlying joints that follow IK around.
We then also Retarget them, since they would have otherwise been recorded onto the original FK controls.
Reparent
Sometimes, you change your mind.
Success!
Guide Space
Now let's talk about a few things you haven't seen yet.
Look, it's Ragdoll Blaine!
So what's happening here? Well, it looks like a Soft Pin to his head, along with a slight Guide Strength on the rest of his body. But unlike the Rigid, another significant advantage to Markers is their ability to capture both local and worldspace position and orientation of your controls. And because of this, you are able to interactively choose whether a marker should look at the Worldspace or Localspace position of your controls.
Notice how with a Guide Space = -1 the controls arms remain relative the torso. And with Guide Space = 1 they instead follow the worldspace orientation of the controls. Just like a Soft Pin.
This attribute is also animatable, and is how you can transition from animation into simulation and back again.
Here's a more complete example:
| Frame | Transition |
|---|---|
| 100 | Starts as a regular animated character |
| 125 | Transitions into physics as he jumps, for a physically-correct trajectory |
| 155 | Transitions back to animation once he rolls over on that cabinet |
| 160 | Transitions back to physics until he stands up |
| 170 | Transitions back into animation to match an exact pose |
| 200 | Partially transitions into physics, for secondary motion in the upper body as his arm is raised. |
Transitions
Let's have a look at how you would use markers to transition between simulation and animation.
Notice how we're animated up until the jump, and then Ragdoll takes over. Once he approaches that box, we turn our Guide Space from -1 to 1 and have him reach the target pose in worldspace. Once he's close, we switch Input Type to Kinematic and kinematically move him until we once again transition to Guide, this time with a Guide Space or -1 for pose space.
Self Collision
Previously, it was very important that your shapes did not overlap any shape other than it's immediate neighbour. If they did, chaos ensued.
Before
Clavicles intersect their parent spine, but also each other!
After
With the new Self Collision = Off, this is no longer a problem.
This can be taken into the extreme!
And here's a another example to fill out a large volume in the center of a character.
Attention
Notice how the spine is made up of many shapes, some of which cover the width of the body, others the depth. An overlapping mess that would never have simply not have been possible without self-collision support!
Original asset created by Mehmet Tayfur Türkmenoğluwe and Dr. Reel, licensed by The Rookies.
No Graph Editor Mess
Because Rigids were children of your controls, Maya had a funny way of including them in the Graph Editor that rightly drove animators, myself included, absolutely mad.
Before
Just look at this; why-oh-why would I want channels from a completely unrelated node when working with the hip?
After
Contrast that to this, whereby only the nodes you actually select are made visible. You can even select Markers via the Channel Box and deselect your controls to get up real close.
No Initial State
A significant effort was made to make the simulation start where you expected it to.
Under the hood, simulation and animation were at odds with one another. Ragdoll needed to know where to start, but it was also telling your controls where to start. It's an inherent cycle, which was finally broken.
Read More
You can read all about the month-long journey in the release notes from March
Nowadays, you barely have to think about it, but it does occasionally rear its ugly head. It is a hack.
With Markers there isn't any cycle to begin with. Ragdoll only reads from your controls, it doesn't write to anything. Under the hood, recording is a 2-step process; first it simulates, and then it writes animation back onto the controls. That's how this cycle is broken, without having any effect on the overall workflow.
No More Cycles
With the previous version, because Rigids both read and wrote to each control, you could sometimes run into a situation where the parent depends on a child.
Before
Here, I'll try and make a second chain in the opposite direction of how the controls are laid out hierarchically. This cannot work; because in order for Ragdoll to figure out where the Passive hand should be, it would first need to consult the upper arm, which is both dynamic and a child of the spine, which is also dynamic. It's a lovely cycle. ❤️
After
With Markers, this isn't a problem because to Ragdoll every limb can now be independently evaluated, in parallel.
Lollipop Controls
Sometimes, markers are added to an already busy control with tons of Channel Box entries. Lollipop controls can help organise things a little better.
These can be moved around and scaled to suit your needs, and will provide access to the same marker node in the channel box, so you can select and edit the marker from either the originally marked control or this lollipop control.
Rotate Pivot
Use the default Maya rotate pivot to control where to pin a simulation, both in worldspace and localspace.
Attention
Take care about scale, especially the scale pivot. Ragdoll can sometimes struggle when the scale pivot differs from the rotate pivot. This will be addressed in a future release.
Quality of Life
Some minor things to brighten your day.
Real Ground
With Rigids, the ground was embedded into the scene. With Markers, an actual ground is created to for more stability and more control over its physical parameters. Something that can also be animated, and that dynamically appears right underneath your markers.
Joints and the Attribute Editor
The Attribute Editor doesn't show you Rigids related to Maya joints because of a Maya UI quirk.
With Markers, this is no longer a problem!

Hidden Solver
Hiding the solver completely removes all overhead of having Ragdoll in your scene. Previously, with rdScene and rdRigid, because they were directly connected to your controls, hiding things made little difference. But now, because we no longer have this direct connection, all computations come from explicitly seeing the rdSolver node.
No visible rdSolver node, no computations. Period.
Enhanced Determinism
TLDR
Sometimes, re-opening the scene could lead to different results. This has now been fixed.
Each time you play a simulation starting from the beginning, the results are the same. This is an important characteristic of any simulation and is called "determinism". It used to be the case however that when you re-opened the scene, there was a small chance the results would differ from when you last saved it.
This has now been fixed. The determinism is now dependent on the order in which rigid bodies connect to the rdSolver node. It's an array attribute, whose order is saved with the Maya scene.
Multiple Floating Licences
Whenever a machine connected to your floating licence server, the host and IP were stored on the machine in an effort to speed up subsequent connections made. However, this also meant that you weren't able to update those details.
Despite providing new details, Ragdoll would favour the already-stored details. Worse yet, the Ragdoll UI would lie to you, by repeating the connection details provided in the RAGDOLL_FLOATING environment variable, despite those not actually being used.
This release addresses this by always using the details you provide, and not bother reusing any previously provided details. In addition, you now have the option to explicitly query and set server details directly.
# Will query the *actual* server used by Ragdoll, rather
# than return the environment variable you provided
cmds.ragdollLicence(getServer=True)

# Will manipulate the currently-in-use key, meaning it will
# try and drop a licence from this address as well
cmds.ragdollLicence(setServer=("localhost", 1313))
Next Release
This release is part ¼, for next 2/4 release you can expect Performance Improvements.
In this release, simulation and overall Maya scenegraph performance has seen a 200x performance boost, the performance is already there. You'll notice it as you try them on your rigs.
However, rendering performance has dropped significantly, cancelling out most of that performance gain. Here's what performance looks like now.
Rendering mostly Maya default shading, rendeing its own things. Unrelated to Ragdoll. The Rig Evaluation on the other hand is almost entirely Ragdoll. It's connected to every control in this rig, forcing each control to be evaluated in serial; one after the other.
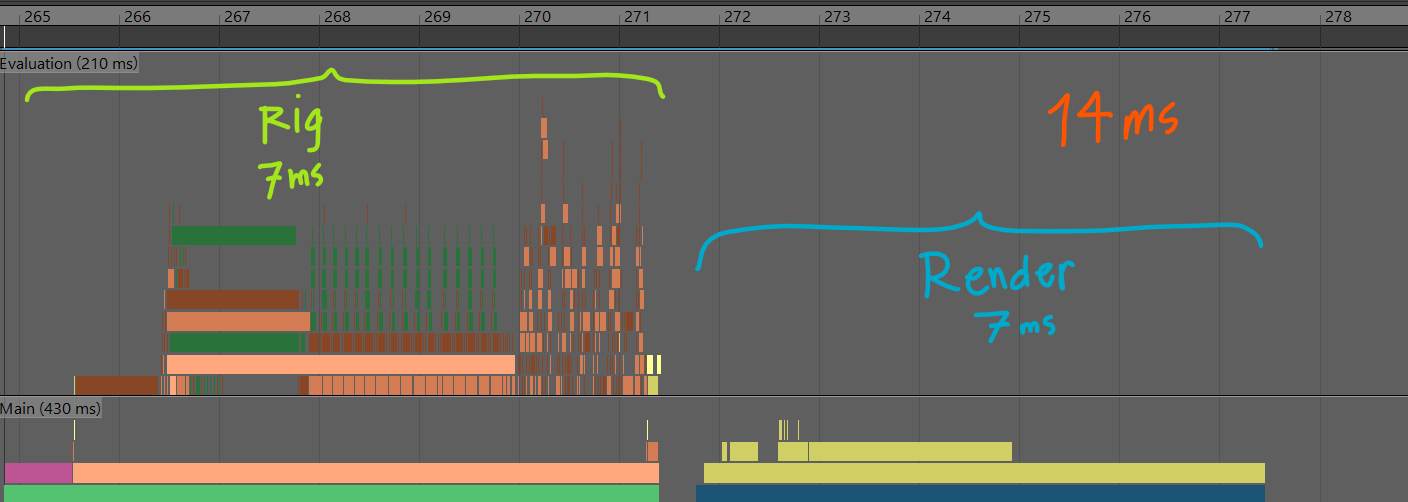
Here's what it looks like with Markers.

Notice the huge pile of lines to the left? Those are all running parallel and almost entirely default Maya evaluations; things your rig would do without Ragdoll. Rendering on the other hand is almost entirely Ragdoll, it is very slow.
To properly compare performance between Rigids and Markers, here's what you should be looking at.
This is the only thing Ragdoll does to your rig. This is the entire overhead, the added load onto your rig. 16 microseconds. That's 0.016 ms. For a rig to run at 30 fps, it'll need 1,000/30 = 33 ms per frame. This overhead, 0.016 ms/frame is all Ragdoll needs to solve an entire character, contacts and constraints and forces, all of it. In this particular profiling, that's 430x faster than Rigids, which not only took longer to solve but made everything else slower by just being connected to your controls.
So how about we get this rendering performance sorted, shall we?
Limitations
These are some of the things lacking from Markers in this release that we'll be working on for subsequent releases.
- Selecting rigids interacively
- Manipulating shapes interactively
- Manipulating constraints interactively
- Toggle between previous animation and recorded simulation
- Support for recording onto an animation layer
- No "live-mode", where physics drives a control interactively
- Markers cannot be exported
- Markers cannot have additional constraints