2026.01.30 - Maya
The highlight for this release is Soft Contacts!
- ADDED Soft Contacts Squishy humans and more
- ADDED User Interface New and improved
- ADDED Physically Based Rendering New continuous renderer with raytraced shadows
- ADDED Contact Visualisation Gain better understanding of forces
- ADDED Tapered Capsules Capsules with a different start and end radius
- FIXED Quality of Life Life, but better!
- ADDED MacOS Universal Binary ARM and x86 alike
- ADDED Known Issues Keep an eye out for these
Overview
And we're back!
You should start seeing more frequent updates from now on, as our updated architecture is now complete and ready for the next couple of years of innovation!
You are reading part 1 of 9 for Ragdoll 4.0. Each new piece will add something extra to Ragdoll.
In this article, we'll focus on what you can expect from this first piece. Let's go!
Soft Contacts
Contacts can now be soft, like in reality. Meaning you can now do things like this!
Soft Contacts: ON
Soft Contacts: OFF
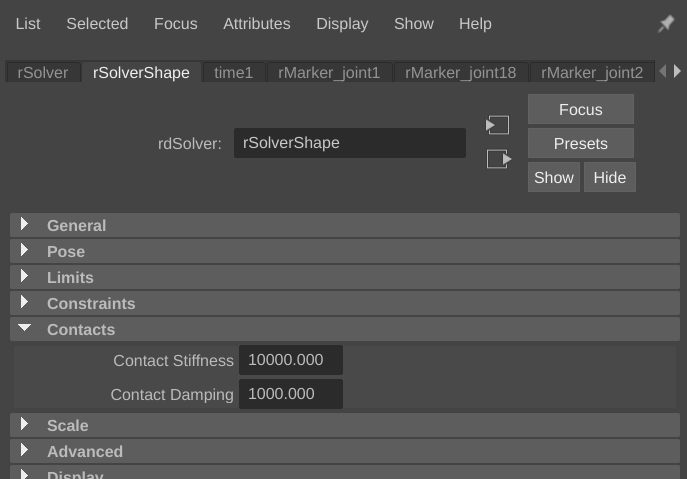
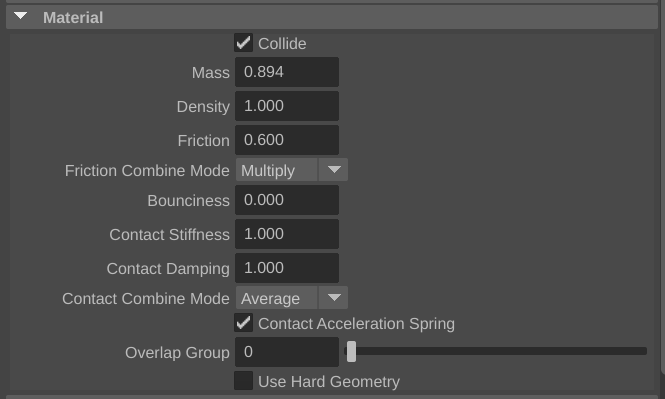
You'll find 2 new attributes on your Marker.
Contact StiffnessContact Damping
They work much like the Rotate Stiffness and Rotate Damping attributes you already know.
Some more goodies, courtesy of Jason Snyman.
The difference is subtle but significant, have a look at this.
Hard Contacts
Soft Contacts
Why?
In the world you and I live in, no contact is 100% hard. Even if it's diamond-to-diamond, materials flex and give way to one another. Even if only a little. But rigid body solvers traditionally treat contacts as if they were, resulting in a wooden puppet-type of look.
This has a couple of advantages.
- Simulate soft objects, like humans and rubber tyres
- Enable tension, like biceps pushing against torso
- Greater stability, when self-intersecting
- More realism overall, like the bouncing ball actually compressing
Tension
One of the hardest things to animate - tension between two opposing bodies.
Often avoided altogether and when attempted typically falls flat. A hand pushing against a wall, a character standing firm on the ground. Big forces being opposed by big forces. An unstoppable force against an immovable object.
With soft contacts, you can now simulate this phenomena.
Here's what it looks like without Soft Contacts.
Notice the initial separation of objects, as Ragdoll proceeds to remove any self intersection. Followed by what looks like a wooden puppet pushing against a wooden cylinder.
Stability
Most real-world characters have intersections on the start frame, it's often unavoidable. The worst offender are those that simply cannot be resolved, such as between the upper legs and yoga ball in this example. The ball would like the legs to go away, but they are unfortunately attached to the hip.
Without soft contacts we get the familiar "explosion".
With soft contacts on the other hand, this instead turns into tension, which is perfectly acceptable.
Here's a closer look at the forces generated in each case.
Inner Hard Contacts
Sometimes, you want soft contacts but also want to avoid a whole body part or entire character falling through the ground or passing straight through another Marker.
That's why Ragdoll enables you to specify both a mesh for collisions and a hard mesh.
Consider the following case. The arm is soft, but falls so fast it temporarily clips beneath the surface.
With a series of inner meshes, this can be avoided.
You assign a hard mesh in the same way you assign a regular (outer) mesh.
Neat!
Outer Hard Contacts
A Contact Stiffness = -1 will restore the hard contact behaviour from Ragdoll 3.0 and earlier.
This can still be useful for things that either should not intersect at all, or for tuning stiffness between a combination of hard and soft Markers.
- See Advanced Contact Combinations below for details
Soft Animation
Both stiffness and damping can be animated!
Soft Globals
At the solver level, you have control over the overall contact stiffness of all Markers in the scene, accessible via:
rSolverContact StiffnessContact Damping
Similar to what you wil also find for limits, constraints and Markers.
The formula looks like this.
final_stiffness = marker.stiffness + solver.stiffness
final_damping = marker.stiffness * marker.dampingRatio + solver.damping
Different Mental Model
It can behave like a "soft body", but it isn't quite a "soft body".
In the real world, dropping a squishy ball onto a marble floor causes the squishy ball to compress significantly.
The two opposing objects can be thought of having:
marbleFloor.contactStiffness = 100squishyBall.contactStiffness = 0.1
But this doesn't directly translate to Ragdoll. When these two objects come into contact, a constraint is created - almost like a pin constraint (without Rotate Stiffness) - and this constraint needs a single stiffness and damping value. And so, the stiffness and damping of the two objects are combined into an average of the two.
combined.contactStiffness = 50.05
And a stiffness of 50 is still very high. You can experiment with different ways to combine these, I expect we will too. See below.
Advanced Contact Combinations
The final stiffness and damping between two colliding Markers is determined by a "combine mode".
Default
Stiffness and Damping are averaged per default.
We expect the default should suit most needs, but if you find yourself adventurous, try some of the alterative Contact Combine Mode values.
- Average
- Min
- Max
- Multiply
Each do what you would expect; an average means that if one Marker has a stiffness of 1.0 and another with 9.0, then their average will be
(1.0 + 9.0) / 2.0 = 5.0
The Multiply case should be used with care. Stiffness and damping values are multiplied by those on the solver node, which default to tens of thousands. When you then combine two contact stiffnesses via multiplication you end up with far greater values than their average.
# Multiply
10000 * 100000 = 1000000000

# Average
(1000 + 100000) / 2 = 50500.0
And values that end up too large become fragile and unstable.
Hard against Soft
"What if a stiffness of
-1collides against a stiffness> 0?"
The answer is, no combination takes place. Only the soft stiffness is taken into account. This can make tuning easier as you now only have to worry about values on one side of the contact.
Default Hard Ground
From Ragdoll 4.0, the default ground is hard, to account for things such as feet not intersecting it.
Gotchas
Ragdoll can sometimes struggle to produce consistent contacts for rigid bodies that remain intersected.
Having a look in wireframe, we can spot what happens under the hood.
Because the two surfaces are inside of each other, there is no clear winner and so it alternates between two or more sets of contacts, resulting in having what appears to be a life of its own.
This is almost exclusively related to meshes, you should find simple shapes, like spheres, boxes and capsules, much more stable.
You can cope with this by either slightly tuning your stiffness/damping until it goes away, or trying to keep intersections to when they move and only for a short period of time.
The Return of Simple Shapes
As a result of the above "gotcha", you may want to consider sticking with simple shapes. Since intersections are no longer of relevant concern, you may simply not need the precision of convex hulls!
For example, notice here how it never comes to rest.
Conversely, notice here how it acts much more predictably. Also notice the many fewer contacts generated; these are the real performance killer for your simulations, they are expensive!.
Change in Behaviour
It also wobbles a lot more. Ideally, the lesser forces should the sum of all smaller contacts, such that the behaviour is preserved. Alas that does not always happen, so additional tuning may be required.
The Upside Down
What happens when a Marker is so soft that other Markers falls straight through?
Notice how a force is pushing the shape upwards until it reaches the middle. At that point, gravity and contact resolution are on the same team, both pushing the Marker out.
Examples
Previous hard contacts
Notice how they appear as though diamond landing on diamond. No softness at all. Very unnatural.
Some softness
Add some stiffness, and they'll behave more like boxes falling onto grass.
Some springiness
Or a jumping mat, why not.
Lots of springiness, and little springiness
Crank things up, and they can appear as though they fall onto a very springy mat, or a soft cushy mattress.
Or mud, because why not?
User Interface
The UI has seen a complete overhaul.
Breakdown
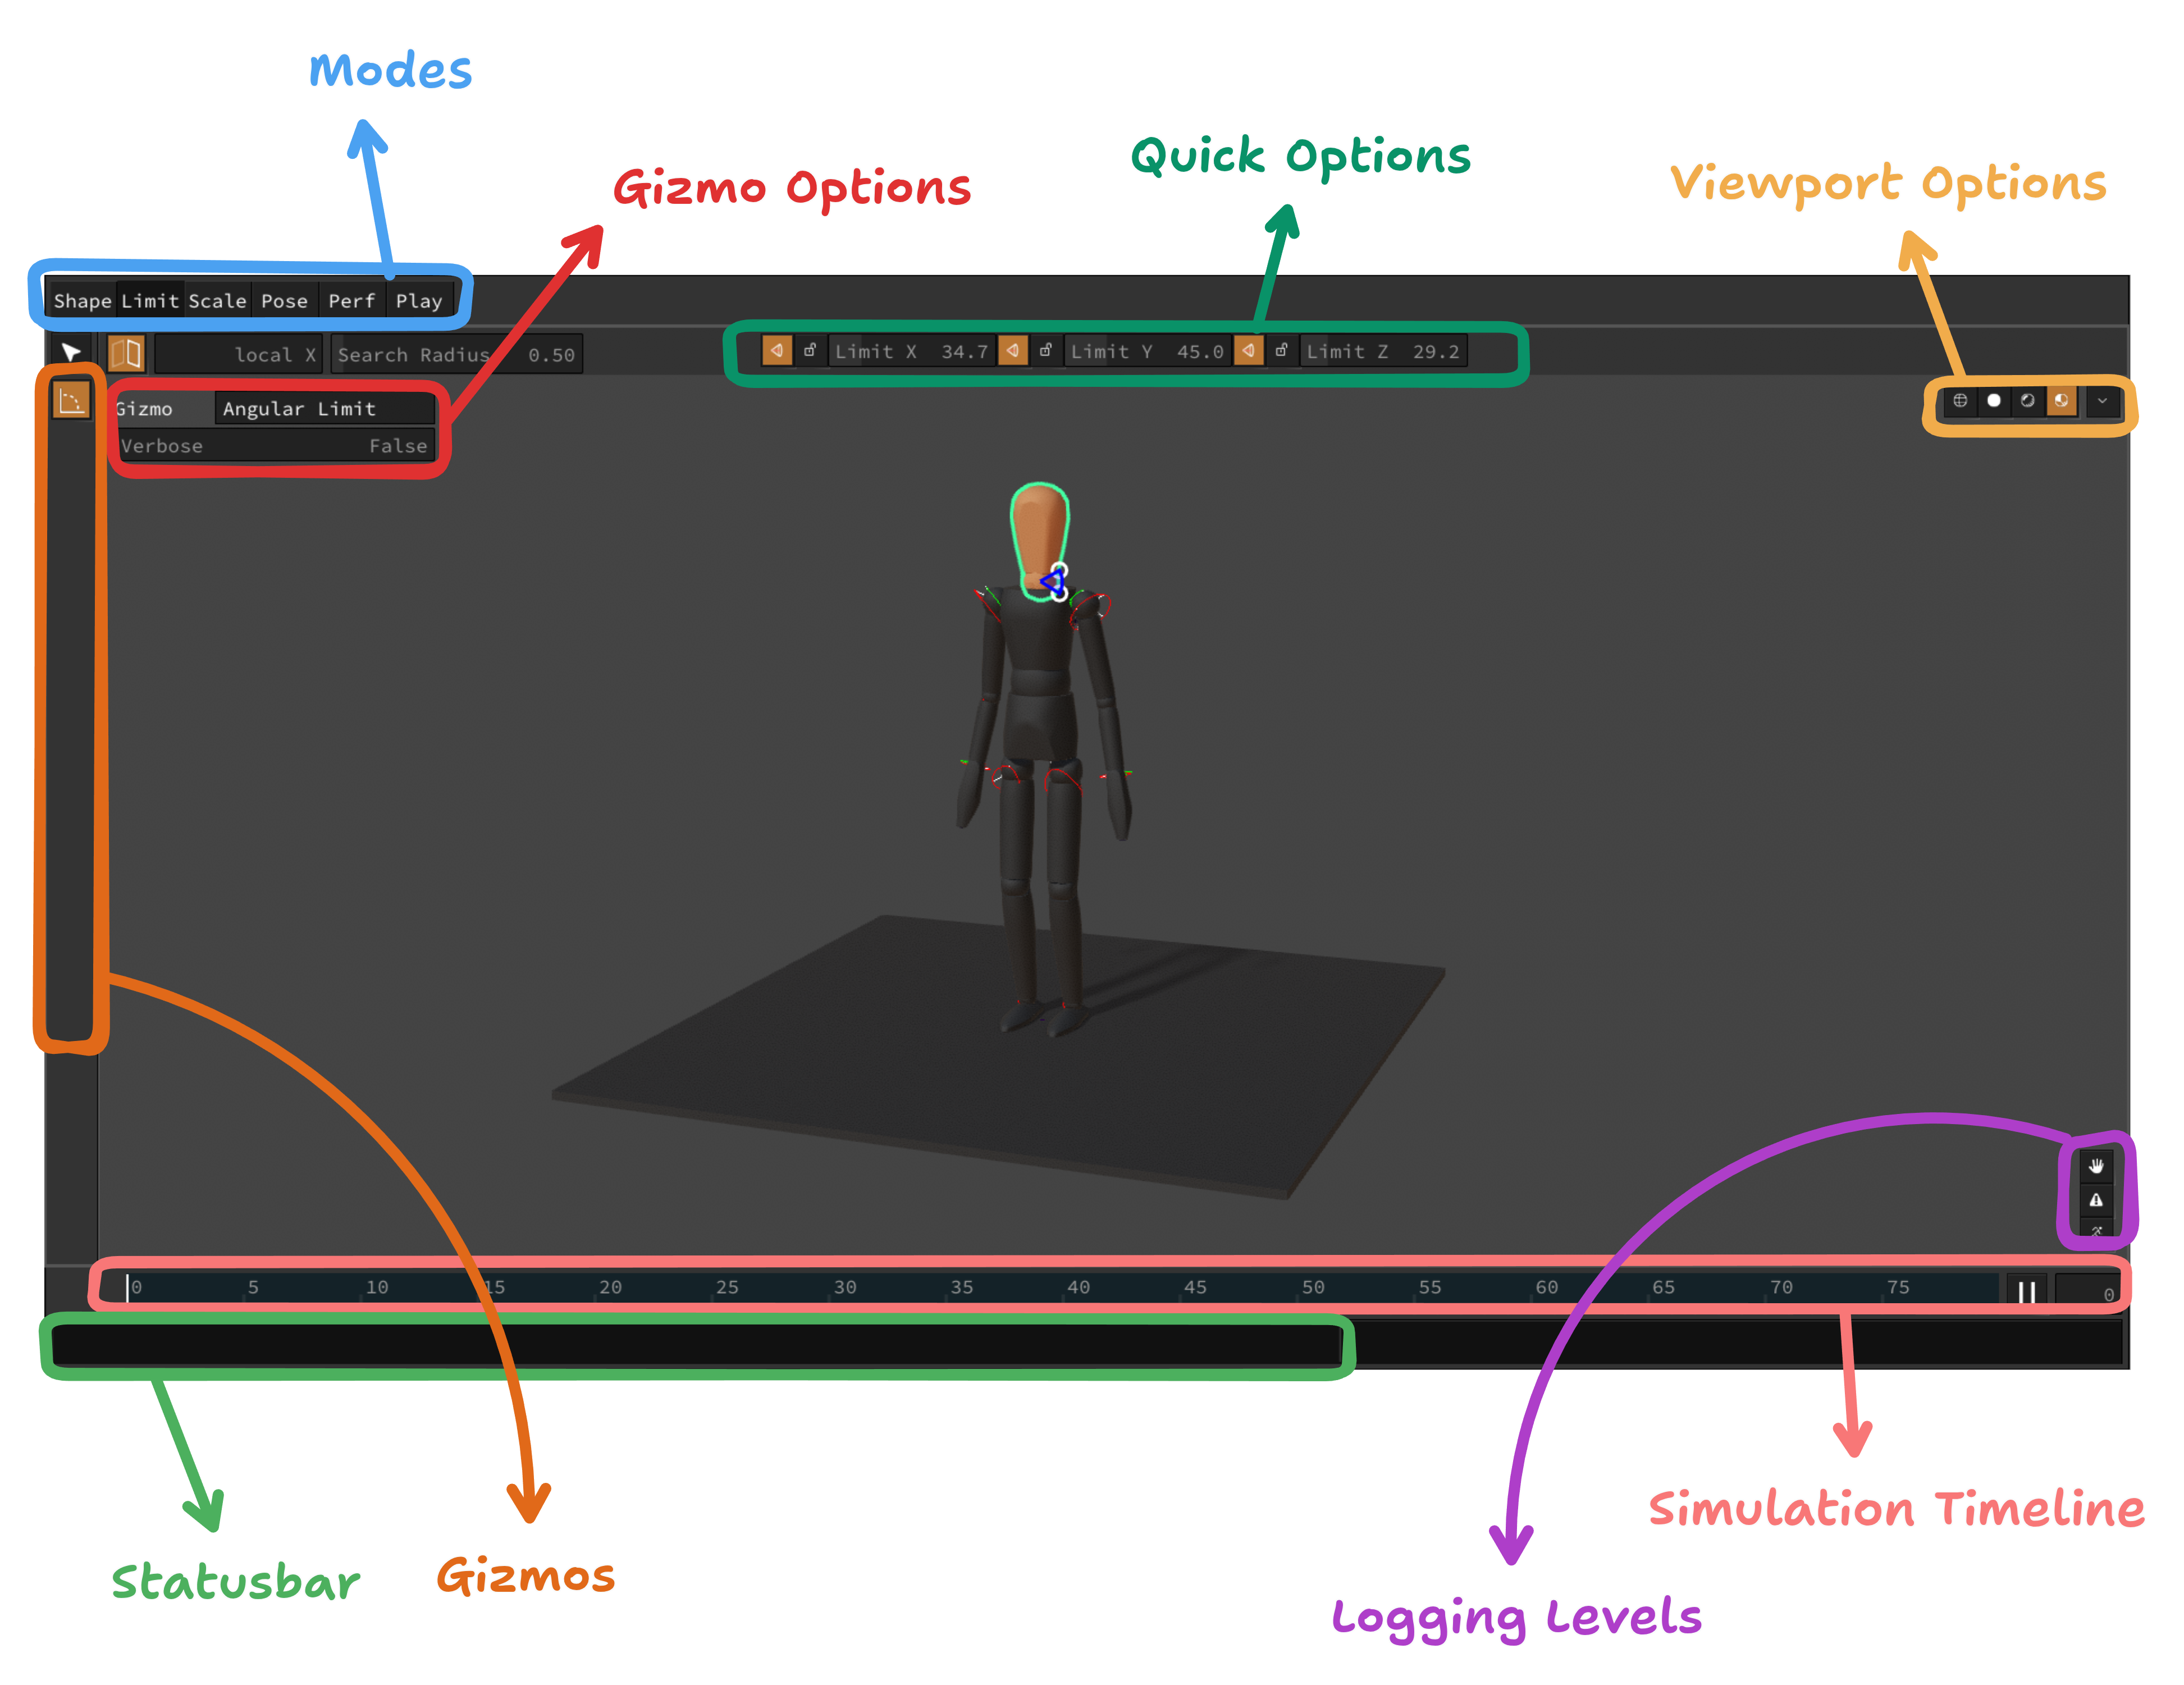
- Modes The various modes, such as Shape Mode and Pose Mode. See below for details
- Gizmos Interactive tools whilst using the Manipulator
- Gizmo Options Options relative the currently chosen gizmo
- Quick Options Selection-sensitive, common options
- Viewport Options Rendering parameters, such as shadows on/off
- Simulation Timeline Amount of frames simulated so far
- Log Level Control how catty Ragdoll should be
- Statusbar Hover elements in the UI and read about them here
Shape Mode
There is currently 1 gizmo in Shape Mode, which is what you'll use to manipulate shapes. It is a direct port of the previous abilities you had in 3.0.
- Translate - Middle-mouse drag
- Rotate - Ctrl/Cmd + Middle-mouse drag
- Scale - Ctrl/Cmd + Left-mouse drag
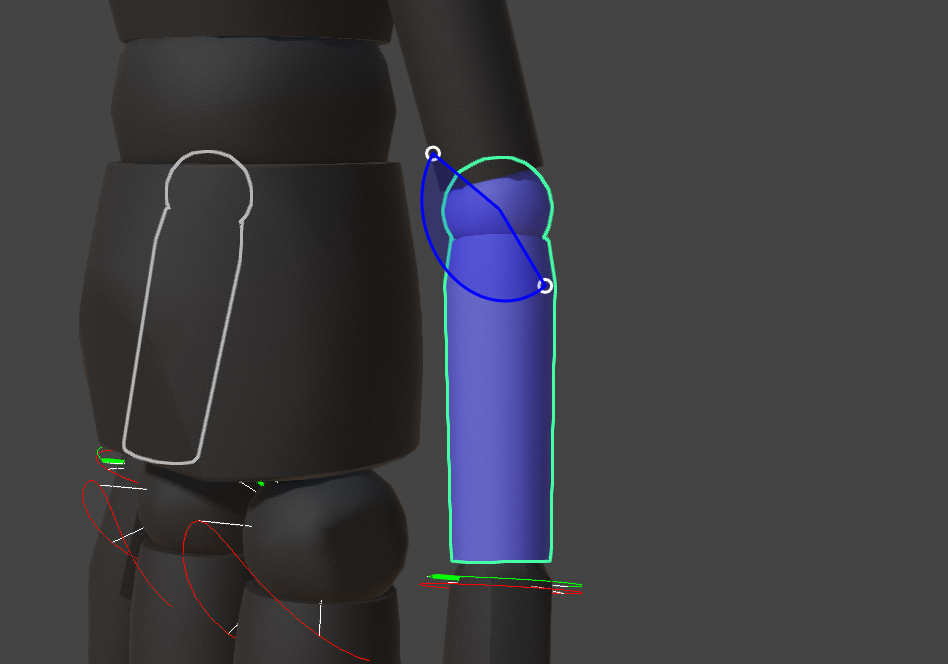
Capsule shapes display a start and end handle you can drag.
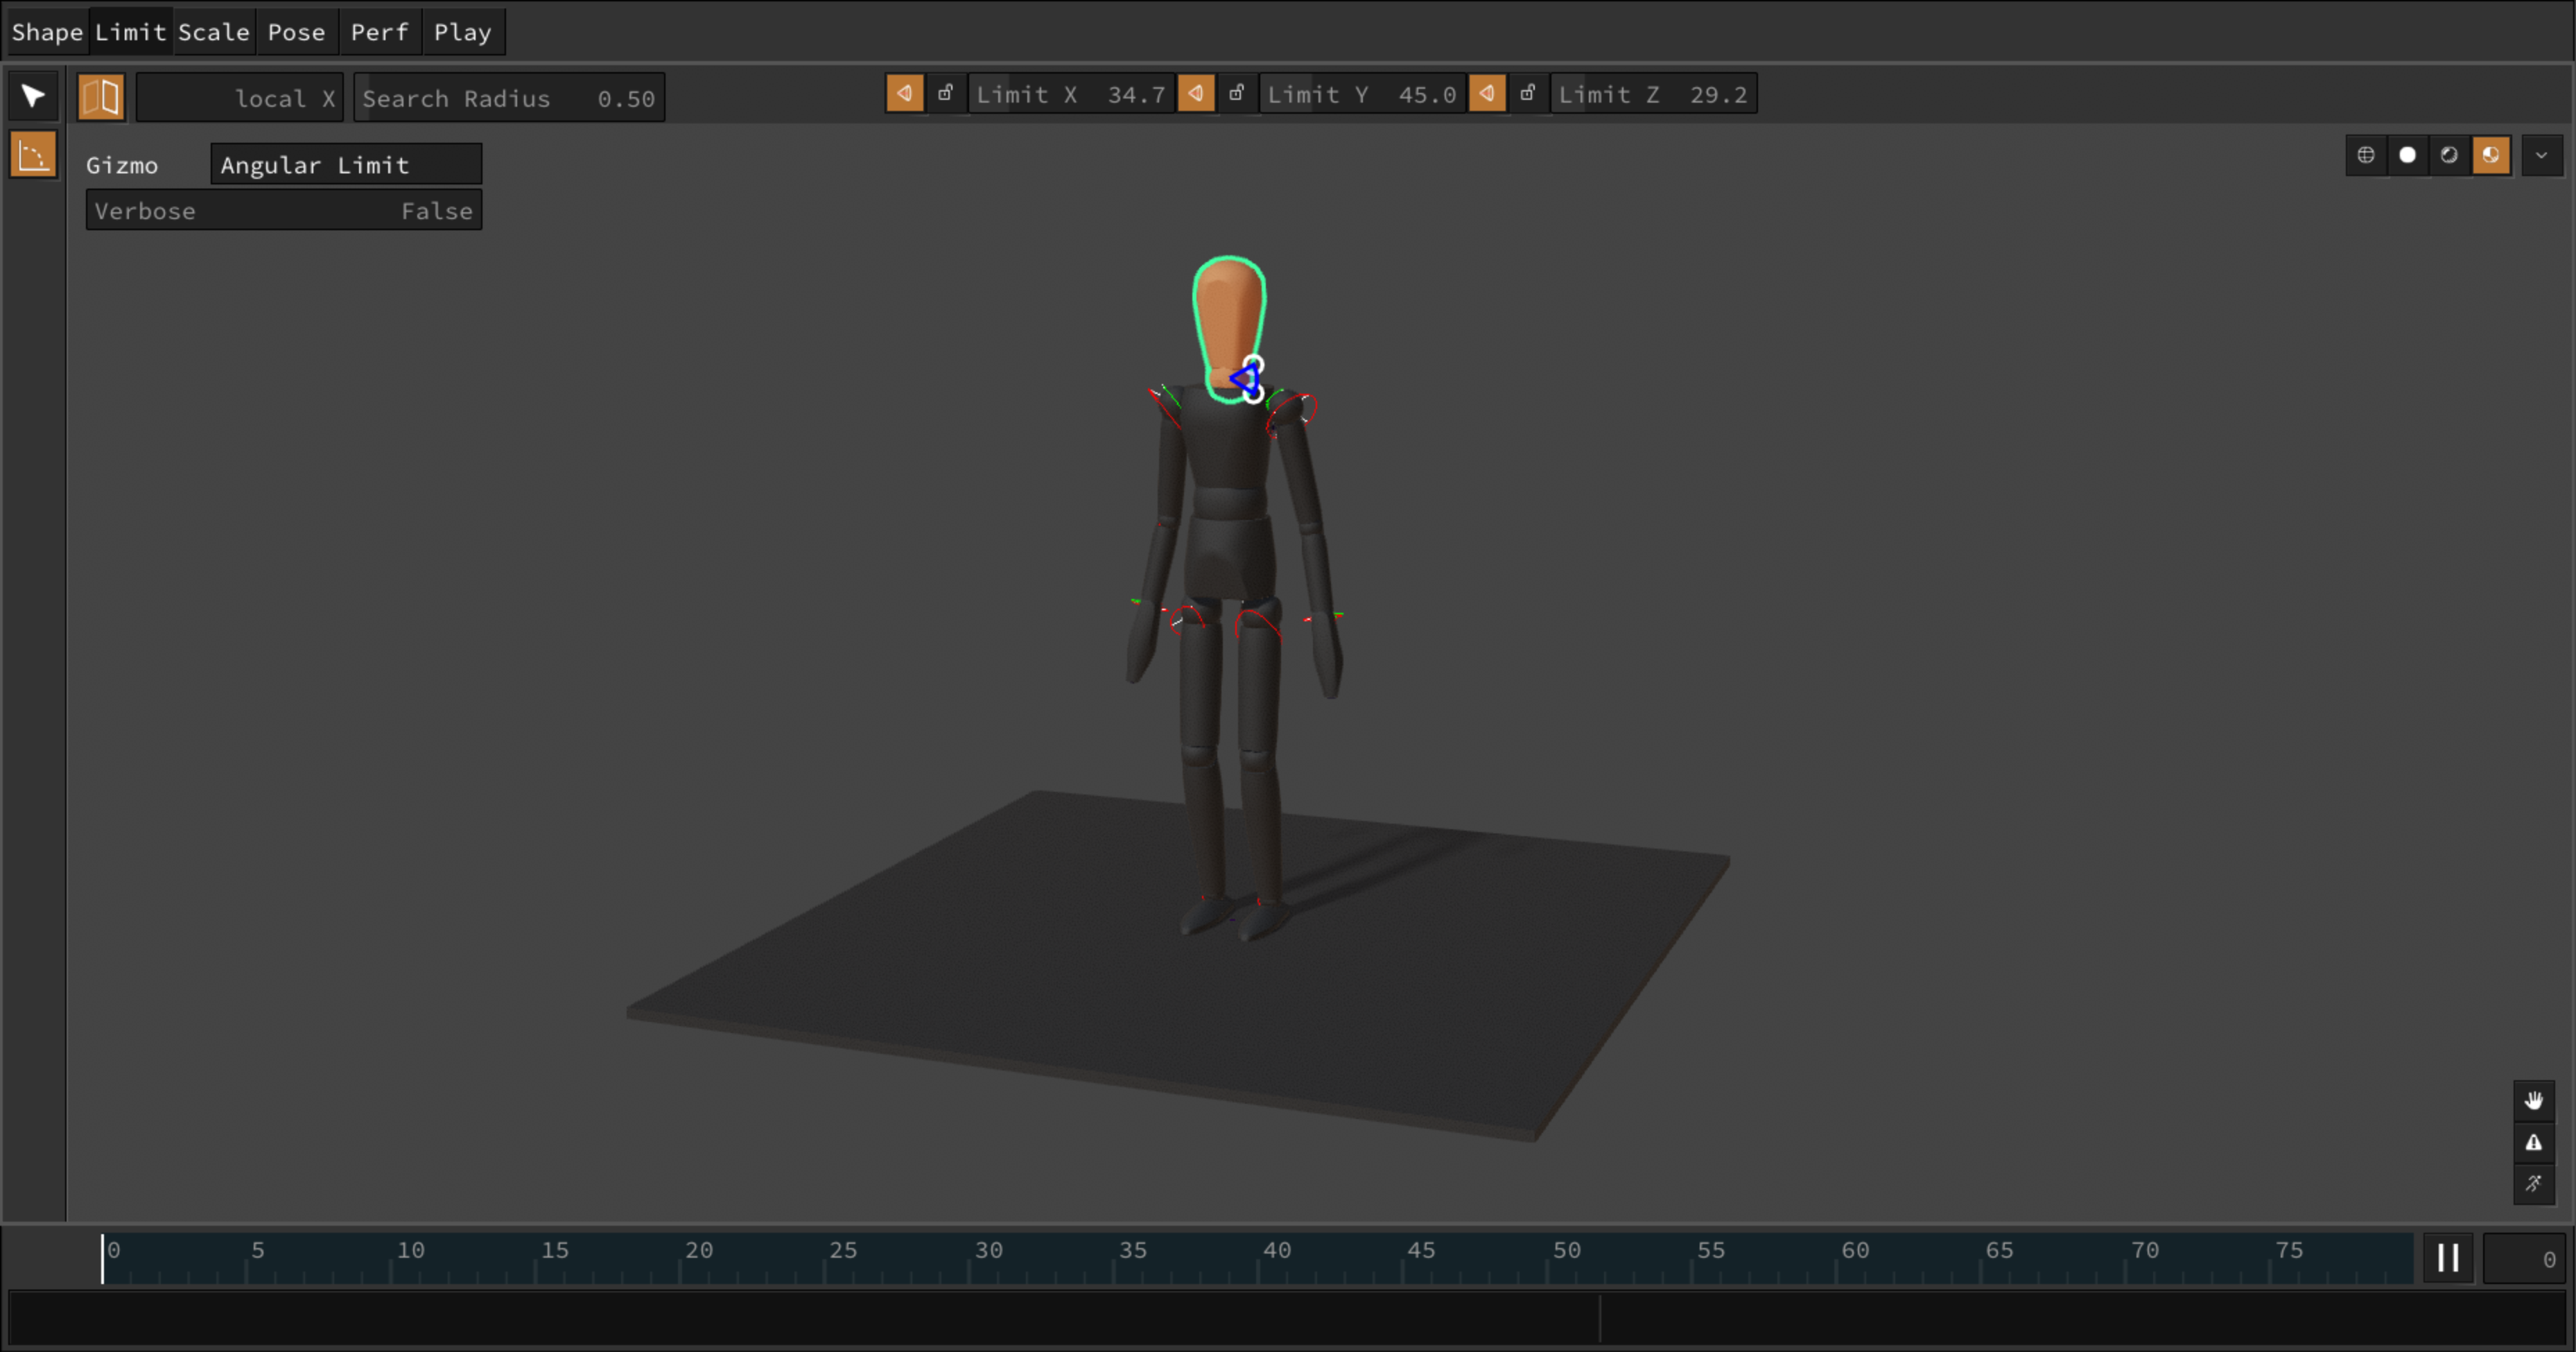
Limit Mode
Tune limits in Limit Mode.
Scale Mode
Adapt the physical world to your Maya scale.
Fit the character gizmo to the height of your character, and you are good to go.
Maya Scale
The default Maya unit is centimeters.
Some choose to customise it to e.g. feet. Others choose to ignore it altogether, which is what leads to models 18 cm tall or 180 km tall. Since there is no reference point in the Maya viewport, once you've adjusted your camera there is no way to tell scale.
But Ragdoll needs a realistic scale for realistic results.
Scale Mode affects the Scene Scale attribute on your solver to match Ragdoll to your expectation.
Pose Mode
Interactively explore your character and its limits, to get a sense of what it can and will do during simulation.
Previously Known As
"Live Mode" was split into two modes, Pose Mode and (Live) Performance Mode. Performance Mode is due for the next release.
| Instrument | Description |
|---|---|
| Pinch | Apply a force onto a single point and drag |
| FK | Pinch, but child hierarchy remains firm |
| IK | FK, but grandparent is frozen |
| Attach | Let one Marker follow another |
| Drop | Apply gravity onto selection or hierarchy |
| Tense | Restore a pose in local space |
| Restore | Restore a pose in world space |
| Mask | Keep a Marker in place |
| Simple Restore | API example of how to write your own instrument, stay tuned |
Other Modes
Stay tuned. :)
Z-Ray
Futurama
Fry: Uh, what is this?
Seller: Arh, it is x-ray eye. See through anything
Fry: Wait a minute. This says "Z-ray"
Seller: "Z" is just as good. In fact, is better. Is two more than "X"
Fry: Hmm, I can see where that could be in advantage. Do you take cash?
Drawing in wireframe now gets you an enhanced view of the underlying mechanics of your simulation.
The especially interesting ones are the ones happening between objects of the same character.
Tapered Capsules (beta)
More control over shapes, without resorting to polygonal meshes.
Roadmap
This is what will soon power the Ragdoll modelling tools. However there is currently no Manipulator interface for it, the controls are all in attributes in your Channel Box.
Physically Based Rendering
The rendering pipeline has been upgraded with some new bells and whistles!
- Image-based lighting
- Continuous Rendering
- Smooth Shading
- Shadows
- Ambient Occlusion
Viewport Options
Explore the various options for rendering your scene.
Continuous Rendering
Part of the change in rendering architecture is updates now happening at 60 fps in the Maya, Blender and Motion Builder viewport, like they do in Ragdoll Standalone, independent of user input of host rendering.
History
In Maya, rendering has traditionally piggy-backed on the MPxManipulator triggering viewport updates on mouse input. When the mouse moved, the viewport was updated.
Future
With continuous rendering, we can now animate UI and provide more interactive feedback.
It's also what powers playback within Live Mode and Performance Mode, more on that later!
Smooth Shading
The smoothest normals since 1979.
Hard Shading
To revert back to the previous hard shading, try this.
import ragdollc as rd
host = rd.host.getInterface()
host.setBooleanOption("smoothShading", False)
Or navigate to the Preferences in the UI and look for the Smooth Shading option.
Shadows
Pixel-perfect ray-traced shadows. Should help make it easier to spot issues with your simulation.
Soft Shadows
Increase the light radius for shadow softness.
Performance
If performance becomes an issue, you can toggle between the more GPU friendly and traditional rasterised shadows.
- Enter Manipulator
- Ctrl + P (for preferences)
- Toggle
Shadow ModetoRasterised
Or via the Script Editor.
from maya import cmds
cmds.optionVar(intValue=("ragdollShadowMode", 0))
# Reload plug-in
Ambient Occlusion
Darkening in the crevices of your geometry make intersections and close contact pop, with this (screen-space) ambient occlusion.
Quality of Life
The little things.
Universal Binary on MacOS

Previously, the MacOS version of Ragdoll was unsigned, meaning your computer would advise against it and make you jump through hoops to make it run.
No more!
Now the installer is good friends with Tim Apple and won't bug you anymore.
Runs on
- Intel Mac (pre M-series chips, from 2015 and earlier)
- M-series chips (e.g. M4)
Non-blocking Option Window
A long-time pet-peeve of mine was having the window block your view when recording your simulation.
No longer!
Custom Maya DPI Scale
You can override the scale of your UI in Maya's global preferences.

Ragdoll wasn't aware of this, and used your display scaling directly. Now it is aware, and scales with Maya as you would expect!
Programmers
For the programmers out there, the trick is to query maya.MQtUtil.dpiScale, instead of going through native Qt, e.g. QWindow.QScreen().logicalDotsPerInch() / 96.0 since Maya overrides this value.
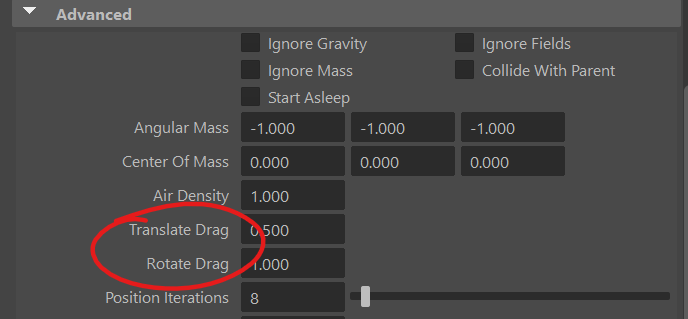
Translate and Rotate Drag
Previously called "Translate Damping" and "Rotate Damping", these attribute lets you block motion of an individual Marker, similar to the Air Density attribute on the Solver except applied to an individual Marker.
No Root Stiffness
Back in 2023.10.03, we introduced Use Root Stiffness such that the stiffness/damping values on any Marker would act as a Pin Constraint. A worldspace stiffness. But, as it happens, this was rather confusing and caused more issues than benefits, this has now been rolled back to a default of False.
You can still enable it, by calling cmds.setAttr("rMarker.useRootStiffness", True) or setting Use Root Stiffness amongst the Marker properties.
Known Issues
Since 2026.01.10, here's what we know.
- User interface colors affected by Maya Color Management