2022.01.17

Highlight for this release is Ragdoll 2.0!
- ADDED Ragdoll 2.0 Talk about next-gen!
- ADDED Export & Import Export physics from one scene and import into another
- ADDED Density Automatically compute the mass based on shape volumes
- ADDED Level of Detail Manage complexity with two or more levels of detail
- ADDED Truly Non-keyable Feedback on whether or not an attribute is keyable or not
- ADDED Markers API The API has been reinvigorated with Markers
- FIXED Mandarin Serial Number Unicode mishap led to a non-sensical message in Mandarin
- FIXED Delta Drawing Bug Funny drawing in the viewport has been fixed
- FIXED Shape Sync Changes to shape properties outside of the start frame could leave Ragdoll and Maya out of sync
- ADDED Max Mass Ratio Keeping you safe
- ADDED Profiler View An in-depth look at where Ragdoll spends its time
- ADDED DirectX Windows users rejoice, DirectX is here
- FIXED Crash on Deleted Mesh Replace a mesh, delete it and crash no more.
- DEPRECATED Legacy API All legacy Python functionaliy now resides in its own package
- DEPRECATED Removed attributes These attributes were harmed in the making of this release.
Showcase
Let's start with the good stuff.
Medusa Breakdown
Excellent Animation and breakdown by Andras Ormos.

Batman Learning Cursive
Animation by Jason Snyman, with a very interesting approach to getting ink out of a pen digitally. 😄
DMV Lady
Courtesy of Dragana Mandic.
Scalable Rig, Scalable Ragdoll
No special setup required, if your rig is scalable then so is Ragdoll.
Circus Import
Toying with the ability to import characters into the same solver.
The Ocean
Give a man a fish, and you'll feed him for 2 ragdolls.
Noodles
Something from the Linux world.
Ragdoll 2.0
Since 28th July 2021, Ragdoll has been publicly available under the "early bird" umbrella. It started out with a reduced price point for those brave enough to venture into new territory and expect a few left turns every now and then as kinks are worked out in the software.
Now the time has come to step into the world as an adult piece of software with the guarantees of any commercially available software and a pricing to reflect that.
And as Ragdoll has grown significantly since those days - given the new Markers - it's only reasonable to consider this Ragdoll 2.0.
January Voucher
Pricing has now reached its intended price point, leaving Early Bird behind. For the next two weeks however, you can use this voucher code to get the Early Bird discount before the deadline.
- Valid for:
Ragdoll Unlimited - Voucher Code:
uX1bFhjZ - Purchase Page: https://ragdolldynamics.com/pricing-commercial

Looking Back
The Ragdoll of today is very different from the Ragdoll of July 2021.
Back then, I had no idea that this amount of performance and usability was possible and was prepared to cram tutorials and documentation until everyone was accustomed to the complexity of physics simulation. 😄
But then something happened - Markers. Like lightning from a clear sky, it unexpectedly changed everything. Performance is now far beyond what Maya is expected to handle, with physics much much faster than simply skinning of a character, and close to the performance of native IK handles. This opens up a lot of possibilities.

The problems faced back then..
- Like the massive endevour starting a simulation wherever your character was.
- Or the need for controls other than your rig to actually animate the thing
- Not to mention the constant chasing of supporting Maya's numerous ways of affecting the position and orientation of your controls, from rotate axes, to rotate pivots, to scale , to....
None of those problems are a problem with Markers. Because Markers look at the world from a different perspective, they just work. It made Ragdoll not only more user friendly and significantly faster but also simpler to develop and smaller in size. The code for Markers is about ⅓ of the equivalent for Rigids. Just think about that!
And most of all, it opened up for all the things you are about to see happen for Ragdoll in the coming months. 🙃
Ragdoll Flavours
Let's take a quick look at the different versions of Ragdoll and how they differ.
| Flavour | Description | |
|---|---|---|
 |
Ragdoll Unlimited | The fully-featured, unrestricted version of Ragdoll. When people talk about Ragdoll, this is the version they mean. |
 |
Ragdoll Complete | The cost-effective flavour of Ragdoll, suitable for freelancers and indie studios. It lacks studio-conveniences such as a Python API for pipeline integration, export to JSON for sharing of physics configurations and is less performant than "Ragdoll Unlimited", being unable to operate in parallel across multiple cores. |
 |
Ragdoll Batch | A non-interactive version without ability to render into the viewport. Suitable for automation and pipeline integration. |
 |
Ragdoll Personal | A non-commercial version, suitable for students and anyone wanting to fool around with Ragdoll at home. It is identical to Unlimited, except that it has limits on how much can be recorded and exported. |
 |
Ragdoll Educational | A non-commercial version of Ragdoll Unlimited whose saved scenes cannot be opened with a commercial licence. |
| Ragdoll Trial | A non-commercial first experience with Ragdoll; this is what you get when downloading Ragdoll onto a new machine and use it without activating it first. Similar limitations to Personal, except it also expires about a month after first use. |
Ragdoll Unlimited
This is the version you want.
It contains everything mentioned on any website, is capable of doing everything you've seen Ragdoll do and is the unrestricted, unlimited and gold standard of Ragdoll.
Ragdoll Complete
This is the version for freelancers.
It is Ragdoll Unlimited, with a few limitations.
- Limited Performance
- Limited Export
- Limited Python API
Performance is limited in how quickly Ragdoll is able to read from your character. Ragdoll is natively parallel, but Complete turns any character you assign markers to into a Serial affair. Limiting performance by the number of cores you have in your machine.
The advantage of export is that your rigs don't need physics built-in. They can remain simple and without physics, until the animator actually needs it. This feature is limited to 10 markers; for the time being. Generally, export is reserved for Unlimited and users in need of pipeline integration. But Complete let's you get at least a taste of the comfort and flexibility of exporting your physics contraptions from one scene and importing onto an unsuspecting character in another.
Like Export, the ability to interact with Ragdoll through Python is an important part of any production pipeline; not so much for the individual animator of small indie studio.
Info
At the time of this writing, this limitation is not yet in place, and users of Complete is currently able to utilise the Python API just like users of Unlimited. This will be addressed in an upcoming release.
Ragdoll Batch
This is the version for your render farm.
It's a low-cost alternative to Ragdoll Unlimited, without the ability to render into the viewport. Making it effectively useful only via Python. It is also unable to export and lacks the parallelism of Unlimited.
Unlike all other flavours, a Batch licence is reserved per-process; meaning that if you spin up 2 mayapy instances on the same machine, it will occupy 2 licences. This obviously only works if your licences are floating, as otherwise a machine can only carry a single node-locked licence, limiting it to a single process running Ragdoll Batch.

Ragdoll Feature Grid
Leaving Early Access, Ragdoll is stepping into the world as a 1.0. Here's an overview of what you can expect from now on.
| Feature | Trial | Personal | Complete | Unlimited | Batch |
|---|---|---|---|---|---|
| Commercial Use | ❌ | ❌ | ✔️ | ✔️ | ✔️ |
| Interactive Tools | ✔️ | ✔️ | ✔️ | ✔️ | ❌ |
| Python API | ✔️ | ✔️ | ❌ | ✔️ | ✔️ |
| Multi-Threading | ✔️ | ✔️ | ❌ | ✔️ | ❌ |
| JSON Import/Export | ✔️ | ✔️ | ❌ | ✔️ | ❌ |
| Per-machine Licence | ✔️ | ✔️ | ✔️ | ✔️ | ❌ |
Batchhas a per-process licence, meaning it will occupy one seat per individually running process.
Non-commercial Limitations

Trial and Personal licences are non-commercial, meaning they can't be used for commercial purposes. Such as in a studio, or for anything where money is involved.
When a file saved with a non-commercial licence of Ragdoll is opened in a commercial licence, it'll temporarily turn your licence into a non-commercial licence.
| Feature | Unlimited | Complete | Non-commercial |
|---|---|---|---|
| Export | Unlimited markers | Up to 10 markers | Up to 10 markers |
| Record | Unlimited frames | Unlimited frames | Up to 100 frames |
Early Birds
Did you purchase a Ragdoll Personal licence before this release?
Then as thanks for believing in us and joining early, these limits do not apply to you. Your version is still unrestricted for non-commercial use.
Enjoy! 🥰
Import
You can now import a Ragdoll setup exported from Maya, back into Maya. It'll re-create everything just the way it was.
Can I export scenes I made with an earlier version?
Yes, anything made with Markers can be exported regardless of when it was made.
What is included in the export?
Just about everything.
- Solvers
- Groups
- Markers
- Constraints
- Colors
- Attribute changes
- Retargeting
- Reparenting
- Replaced meshes
- Thumbnail of your viewport
What isn't included in the export?
Very little.
- The mesh itself is not stored, the mesh is expected to come from your rig. Including any mesh you replace. This may be added in a future release.
- The cached simulation, although it will be soon.
Will I get identical results when simulating an imported scene?
Yes, anything else is a bug.
More precisely, determinism depends on (1) the type and number of items in the solver along with (2) the order in which these are created. Both of these are part of the exported file format and is taken into account during import. Meaning you should get identical results so long as the content is the same.
Example
Here's an exported Ragdoll setup for the free CG Spectrum Tiger rig.
To use it, download the rig and import the Ragdoll file.


It contains 2 levels of detail.
| Level | Content |
|---|---|
| Level 0 | Body and feet |
| Level 1 | Everything on Level 0, plus toes |
Workflow
Here's the rundown.
- Assign markers
- Tweak values
- Export
- Open a new scene, with the same character
- Import
On import, Ragdoll will try and find the names of what you exported in your currently opened scene.
- If all names match, import should go smoothly. Preserving all of your hard work!
- If names do not match, if for example the namespace differs, there is an option to override the namespace from the file via the
Namespacedropdown menu. - If names don't match at all, if for example it was grouped differently on export or it is a different character altogether, then you can try using the
Search and Replacefields to modify the names searched for by Ragdoll.
Export
Once you're happy with your character, it's time to export. Towards the bottom of the UI, you'll get a preview of what is about to be exported. This can help clarify that what ends up on disk is what you expect.
Import
In a new scene, with the same character, same names and everything, import as you'd expect. At the bottom of this UI, you'll get a preview of what's in the file on disk, along with how it will associate the node names found in the file with what you have on disk.
Namespace from File
Odds are, the character you're importing either has no namespace, or has a different namespace to what you've currently got in your scene. As in this example here, with 3 copies of the same character, each with its own namespace.
Use the Namespace dropdown to select one of the current namespaces in your scene, or Custom to type one in yourself.
Solver from File
Per default, Ragdoll will import the file into the current solver in your scene, if any. Or, you can import the original solver from the source file.
Known Limitations
Here are a few things that will be addressed over time. Let us know if you encounter anything else!
| Limitation | Result |
|---|---|
| Missing Replaced Mesh | If you replace the mesh of a marker, but this mesh isn't present in the scene during import, you'll get a Capsule instead. The vertices of the geometry isn't stored in the exported file, only the name of the mesh you replaced with. |
| Linked Solvers | These turn into a single, unified solver on import. |
Density

Ragdoll can now automatically compute a suitable mass for each Marker, based on the volume of your shape and a density of your choosing.
In other words, big objects become heavy, small objects become light.
Before
After
Presets
Provide a custom density, or choose from one of the provided ones.
| Density | Value |
|---|---|
Off |
Do not compute, use the Mass attribute |
Cotton |
Very sparse, 0.05 grams per cubic centimeter |
Wood |
Sparse, 0.2 grams per cubic centimeter |
Flesh |
Default, 1.0g/cm3 |
Uranium |
Dense, 19.0g/cm3 |
Black Hole |
Very, very dense |
Custom |
You pick |
Mass is computed based on the volume of your shape, along with a density of your choosing.
Options
Choose between various densities either at creation-time or after creation.
Visualise
The computed mass updates interactively as you change the size and type of your shape, including convex hulls!
In the Manipulator, you'll be able to not only only edit the density, but preview the computed mass given the current shape volume and density you provide.


Level of Detail
Setup your character once with all bells-and-whistles, and interactively pick which level of detail to use for your simulation in a given situation.
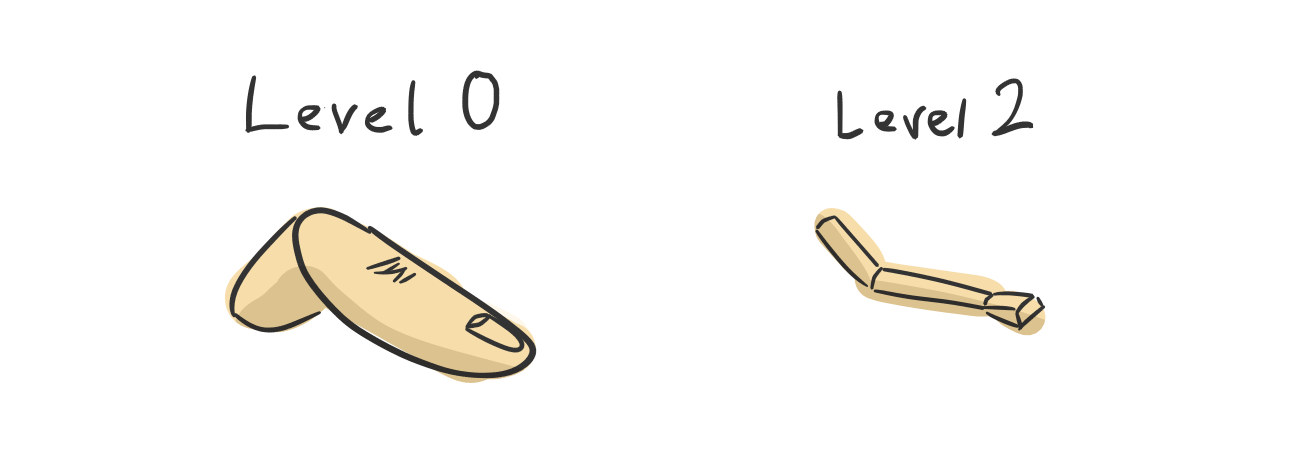
Usecases
- Body at
Level 0, fingers atLevel 1 - Props at
Level 1, muscles atLevel 2 - Major masses at
Level 0, extremities atLevel 1andLevel 2
For example, here's a Wasp character with 3 levels of increasing detail.
As you'd expect, it'll record only the currently active markers.
Workflow
Here's how it works.
- Give each marker a "level", such as
1 - Tell solver which "level" to solve at, such as
1
And that's it! Any marker with a matching level is simulated and recorded.
Operators
What does each level mean? The answer lies in the "operator".
| Operator | Description |
|---|---|
Less Than |
If the Marker Level is less than (or equal) to the Solver Level, simulate it. |
Greater Than |
If the Marker Level is greater than (or equal) to the Solver Level, simulate it. |
Equal |
If the Marker Level is equal to the Solver Level, simulate it. |
NotEqual |
If the Marker Level is not equal to the Solver Level, simulate it. |
With these, you can use each level for..
- An increasing amount of detail
- An increasing amount of reduction
- Something completely custom
With Equal and NotEqual operators, you can have some markers appear or disappear on particular levels, enabling endless combinations.
Roadmap
This should cover a majority of cases, but there are things you cannot yet do, but will be able to in the future.
Capsuleon one level,Meshon another. For higher-resolution contacts.- Dense hierarchy of controls at one level, sparse at another. For e.g. twist joints versus a simple 2-joint chain, or a densely packed spine versus just hip and torso controls.
Algorithm
For the geeks out there, here's what the underlying algorithm looks like in Python.
# Membership types
Minimum = 1  # Present at this level and higher
Maximum = 3  # Present at this level and lower
Only = 4     # Only present at this level
Not = 5      # Present at all levels *except* this one

markers = [
    {"name": "hip", "level": 0, "membership": Minimum},
    {"name": "spine", "level": 0, "membership": Minimum},
    {"name": "neck", "level": 0, "membership": Minimum},
    {"name": "head", "level": 0, "membership": Minimum},
    {"name": "L_upper_leg", "level": 0, "membership": Minimum},
    {"name": "L_lower_leg", "level": 0, "membership": Minimum},
    {"name": "R_hand", "level": 1, "membership": Minimum},
    {"name": "L_foot_box", "level": 1, "membership": Maximum},
    {"name": "L_foot_convex", "level": 2, "membership": Minimum},
    {"name": "R_toe_capsule", "level": 2, "membership": Not},
    {"name": "R_toe_convex", "level": 2, "membership": Only},
]

def resolve(level):
    print("Level %d" % level)
    for marker in markers:
        if marker["membership"] == Minimum and marker["level"] <= level:
            print(" - {name} ({level})".format(**marker))

        if marker["membership"] == Maximum and marker["level"] >= level:
            print(" - {name} ({level})".format(**marker))

        if marker["membership"] == Only and marker["level"] == level:
            print(" - {name} ({level})".format(**marker))

        if marker["membership"] == Not and marker["level"] != level:
            print(" - {name} ({level})".format(**marker))

resolve(0)
resolve(1)
resolve(2)
Run this, and this is what you'll find.
Level 0
 - hip (0)
 - spine (0)
 - neck (0)
 - head (0)
 - L_upper_leg (0)
 - L_lower_leg (0)
 - L_foot_box (1)
 - R_toe_capsule (2)
Level 1
 - hip (0)
 - spine (0)
 - neck (0)
 - head (0)
 - L_upper_leg (0)
 - L_lower_leg (0)
 - R_hand (1)
 - L_foot_box (1)
 - R_toe_capsule (2)
Level 2
 - hip (0)
 - spine (0)
 - neck (0)
 - head (0)
 - L_upper_leg (0)
 - L_lower_leg (0)
 - R_hand (1)
 - L_foot_convex (2)
 - R_toe_convex (2)
Markers API
With the retirement of the legacy Python API, a new Markers API is now available.
from maya import cmds
import ragdoll.api as rd

box = cmds.polyCube()

solver = rd.createSolver()
marker = rd.assignMarker(box[0], solver)

rd.recordPhysics()
The new export and import mechanic can be accessed from here too.
import ragdoll.api as rd
fname = r"c:\path\to\my_ragdoll.rag"

# Get everything out
rd.exportPhysics(fname)

# Remove everything
rd.deleteAllPhysics()

# Bring everything back
rd.reinterpretPhysics(fname)
Legacy API
The old Rigid API is still accessible under a new home.
from ragdoll.legacy import commands
commands.create_active_rigid()
commands.create_point_constraint()
# ...
But will be removed entirely soon, so do transition away from it ASAP.
Quality of Life
Make it more difficult to make mistakes with these new additions. 😊
Max Mass Ratio
With Density, there's a chance Markers get Ragdoll into a situation it does not like; namely that the difference between masses are too great.
Give me the technical details
As you wish. 🤓
Ragdoll doesn't like differences any greater than 10x, sometimes 100x, else it can fail or become unstable. For example, if the torso of your character has a mass of 100kg, and the foot Marker has a mass of 0.5kg, that's a ratio of 100/0.5 = 200x which is far greater than Ragdoll would like. As a result, the body would crush the foot which would be unable to properly hold the entire body up.
Up until now, the masses on all Markers have had a default value of 1kg. Meaning that regardless of the size of a Marker - be it the torso, the head or tip of a finger - it would always have a mass of 1.0. As a result, hands would typically end up far heavier than the rest of the body.
Before
Here's an example of the solver failing. There are three identical chains, the tip of the last one having a mass of 10,000. That's 10,000x greater then each link in the chain. As a result, Markers separate; that is incorrect.
After
If we limit the maximum ratio to just 1000x, we get the correct behavior. You can also see how it affected the other two chains. They now behave more similarly, because in order to ensure a mass ratio across the whole system, the mass of their tips need to be reduced as well.
The new Max Mass Ratio attribute protects against these situations, letting you give objects a suitable mass and only have to worry about which should weigh more, and which should weigh less. Ragdoll will balance everything out before passing it along to be simulated.
What are the consequences?
Sometimes, large mass ratios are what you want. For example, a heavy weight on a string tends to do quite well with ratios up to 1000x. But markers being crushed by another marker 1000x its weight tends to not do as well.
So the result is less of an effect at the extreme ratios.
In the Manipulator, you can preview the final mass used given the density and the ratio you specified.
DirectX

Look. Closely. Look. Closlier.
That's right! You've now got the option to use Ragdoll with Maya in DirectX viewport mode.
Truly Non-keyable
Some Ragdoll attributes are keyable, others are not. Which is which? Impossible to say. Until now!
On attempting to keyframe a non-keyable attribute, you'll now see an error message along with a visual cue things might not work out the way you expect. As opposed to happily setting that keyframe but then ignoring it once the simulation starts, like it used to.
A little quality of life for ya'!
Pro-tip for Riggers
There are at least 2 ways to prevent non-keyable attributes from being keyframed.
MFnAttribute::setConnectable(false);MPxNode::legalConnection()
The former means you are also unable to make a control and connect it to multiple non-keyable attributes. Like if you wanted to control Mass of a series of markers from a single source, or the Overlap Group.
The latter on the other hand is more flexible. It allows Ragdoll to prevent connections to specific attributes or types of nodes, like animCurve nodes, which means animators won't be able to keyframe it but you'll still be able to build controls for it.
And that's exactly how it works.
Delta Drawing Bug
The worldspace deltas were drawn separate from the marker they affected, which could produce a jarring effect especially when the solver position had been offset.
Before
After
This has now been fixed.
More Performance
As an added bonus, we're now also doing 2 matrix multiplications less per frame, per marker. That kind of thing adds up quickly.
Shape Sync
If you play, pause and then change the Shape from Box to Capsule nothing happens. Because the shape, like many other attributes, can only be changed on the start frame.
But, when you later returned to the start frame, the shape would still not update. This has now been fixed.
Profiler View
Mostly meant to keep the development of Ragdoll fast and interactive, you can now spot where most time is spent via the built-in Maya Profiler.
Here's what one frame of this looks like; 5 ms to both simulate and render Ragdoll in the viewport.

Removed Attributes
These attributes were no longer relevant in the last release, but were still present in the Channel Editor. These have now been hidden and will no longer be saved with your file. A few weeks from now, they will be removed.
limitAutoOrientlimitTypelimitAxislimitOffsetXlimitOffsetYlimitOffsetZlimitOffsetlimitRotationXlimitRotationYlimitRotationZlimitRotation
Mandarin Serial Number
It has come to my attention that the first thing every new user of Ragdoll sees is this dialog, with this message for a serial number.
And yet..
Nobody has said a thing! 🤣
Correction shout-out to @Rosaline for pointing this out just a few days ago!

According to my Mandarin-speaking friends, this is jibberish (or at least should be!) and is a result of badly translated Unicode to ASCII characters.
This has now been fixed!
