Bouncing Ball
Bouncing Ball
The fundamentals of animation
In this tutorial, we will reproduce a classic animation tutorial, the Bouncing Ball. With it, we will explore various material properties of a ball whilst learning about the inner workings of Ragdoll.
Version 1.0 - Up to date
Written for Ragdoll 2022.05.04 and above.
Estimated Time
- 🕐 5 minutes
You will learn
- ✔️ How to assign a "marker" onto a
polySphere - ✔️ How to tune physical properties such as bounciness and friction
- ✔️ How to configure the solver for accurate high-frequency motion
Where to find help
If you find or run into any issues with these tutorials, here's what you can do.
- ✔️ Ask on the forums
Motivation
Why should an animator simulate a ball bouncing, rather than just keyframe it?
If you are new to animation or in a neighbouring field such as modeling or lighting, it might seem silly to consider such a trivial task for simulation. But as the more seasoned animator knows, getting the trajectory of any free-flying object right is incredibly hard. It can mean the difference between a believable character, and a character that looks like Earths gravity varies for the duration of a single jump, or one that appears to be on a different planet altogether.
With that in mind, although a single ball bouncing on a flat plane may seem trivial, it can be enough to challenge even the most senior of animators.
Setup
For this tutorial, all you need is an empty Maya scene. So go ahead and clear out all of those references and meshes with hours of history on it and let's get crackin'!
Poly Sphere
Let's make our ball out of a regular Maya polySphere.
- Run
Spherefrom thePolygon Primitivessubmenu of theCreatemain menu - Translate the sphere to
Translate Y = 5.0
What about NURBS?
Yes, if you prefer, you can also use a NURBS sphere.
Dynamics
With our sphere in place, let's give it some physical properties by turning it into a Active Rigid.
- Select
pSphere1 - Run
Assign Markerfrom theRagdollMenu
That's great! Except hm.. It's not really a bouncing ball just yet.
Bounciness
Default settings make the ball rather dull, so let's try introducing some bounciness via its material properties.
- Select
pSphere1 - Select
rMarker_pSphere1in the Channel Box - Set
Bounciness = 1.0
What does 1.0 mean?
It means 100%! Technically, it means any force produced by the ball hitting the ground is reversed in its entirety with no loss of energy what-so-ever.
Infinite Bounciness
The reason the ball stops bouncing is that even though our ball is 100% bouncy, the ground is not. Like dropping a bowling ball on grass or a wooden floor. For perfect bounce, they both need to be 100% bouncy.
- Select
rGround - Select
rMarker_rGroundin the Channel Box - Set
Bounciness = 1.0
Where did the ground come from?
Ragdoll creates this ground automatically for you whenever the first marker is assigned. It can be disabled by setting Create Ground = Off in the Assign Marker option dialog.
Finalise
Now that we have complete control over our ball, let's put it to good use.
You have learnt
- ✔️ How to assign a "marker" onto a
polySphere - ✔️ How to tune physical properties such as bounciness and friction
- ✔️ How to configure the solver for accurate high-frequency motion
Initial Velocity
Give the ball a little push.
- Select
pSphere1 - Animate it moving forward beteween frame 1-2
- Animate
BehaviourfromAnimatedtoSimulated
| Frames | 2 | 3 |
|---|---|---|
Translate X |
0.0 |
0.5 |
Behaviour |
Animated |
Simulated |
Trajectory
With our bouncing ball underway, let's gain a deeper understanding of what it looks like over time.
- Run
Record Simulationfrom the Ragdoll menu - Select
pSphere1 - Run
Create Editable Motion Trailfrom Maya's Visualize menu
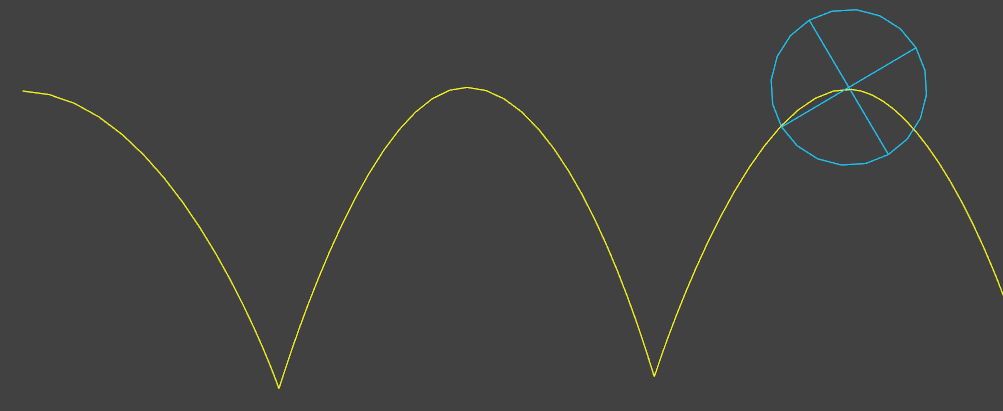
Now, as every animator knows, this is not the trajectory of a bouncing ball. It looks as if the ball isn't actually touching the floor half the time, what's up with that? 🤔
| Expected Result ✔️ |
 |
|---|---|
| Actual Result ❌ |
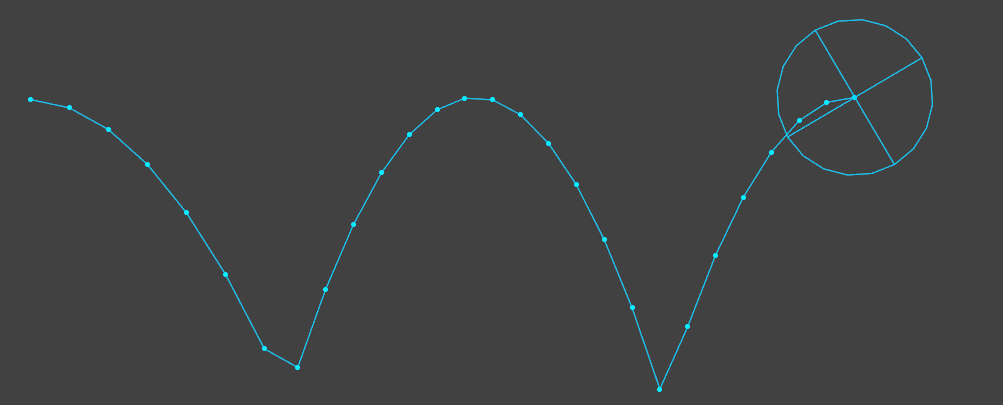 |
This is a problem of resolution. Cameras have this problem too.
See how despite this most definitely not being a simulation (or is it?) we are still getting bounces that don't actually touch the ground! The reason is simply that a camera can only capture moments of reality. It can only sample it.
In this case, the ball did touch the floor, but the camera caught at a slightly different time. Shortly before and after contact. This is how you can think of Ragdoll too; a camera for physics.
Can you overeducate me?
With pleasure. 😁 Let's look at audio.
Notice how sound itself, represented by the curved line, is continuous - of infinite resolution - and that what we capture in our computers are samples of it, at some fixed resolution - typically at 44,000 fps or as it is more commonly known 44khz.
Ragdoll works like this too. Physics is continuous, but Ragdoll can only provide you with snapshots of physics at a fixed resolution; the resolution of your framerate.
Is every bouncing ball tutorial on YouTube wrong?
A typical bouncing ball tutorial has the ball come into contact on whole frames. But because the time between each bounce is decreasing, it is impossible for every bounce to land on a whole frame.
So in a way, yes, they are wrong! Science says so!
Should I change the way I animate?
Well, it depends. Take motion blur for example.
Because you see, the final position from a video recorded tennis ball is only half the story. Motion blur isn't the result of only these samples, but of the actual continuous motion. As light hits the lens inbetween the shutter opening and closing, the ball is still moving.
To accurately reproduce this effect in your animation or with Ragdoll, you still need those inbetween positions of the ball. Just so that your renderer can throw those away once it's done computing motion blur.
Even without motion blur, your eyes and brain still interprets the ball not hitting the ground as though it floats or hits an invisible obstacle. So for the greatest sense of realism when everything has been said and done and the images actually reach your eyes (brain), you may still want to defy physics and realism.
Because at the end of the day, the animation curves isn't what you are making. They are mere tools for you to achieve realism in the final output picture.
Tennis Ball
Now that we've got some reference for a tennis ball, let's tune our settings to match.
- Select
pSphere1 - Select
rMarker_pSphere1in the Channel Box - Set
Bounciness = 0.4
Let's also take it out of orbit and into Earths atmosphere by restoring the Air Density
- Select
rSolver - Set
Air Density = 1.0
Practical Examples
Now that we've got a ball, what could we possibly do with it?
Soft Bounce
Notice our trajectory now has a smooth transition from being in contact to lifting off the ground.
By playing around with the density, we can get different effects.
Or playing around with this invisible collision sphere we've created.
So what's going on here?
- Create a new sphere,
pSphere2 - Parent
pSphere2underpSphere1
Next, let's assign to pSphere2 with pSphere1 as its parent.
- Select
pSphere1andpSphere2 - Run
Assign and Connect
Not much happens, they both move together. Let's change that.
- Select
pSphere2 - Set
Translate Motion = Soft - Select
pSphere1 - Set
Collide = Off
I found values of Translate Stiffness = 0.1 and Translate Damping = 0.1 to look decent.
And that does it! This same technique can be used on full ragdolls too to achieve all manner of soft contacts, have fun. 
Troubleshooting
Let's have a look at some common issues.
Vibrating at Rest
There is no right value for Bounce Threshold, it's an art. And it depends on the size of your scene and rigids, their shape, how fast they move and the look you are after.
When the threshold is too low, Ragdoll can get into an infinite bounce like this.
To address this, increase the threshold until it stops.