2022.02.14
Highlight for this release is Fields!
- ADDED Fields All of Maya's native fields, now supported by Ragdoll
- ADDED Compound Shapes Combine multiple meshes for a single collision shape
- ADDED Manikin 3 Next iteration of the default Ragdoll rig
- FIXED Robust Frame Skips Unbreakable real-time playback
- FIXED Kinematic Stiffness Kinematic markers acting more like you'd expect
- FIXED Manipulator and Viewport HUD Better handling of hiding of the HUD
- FIXED Negative Scale One more edgecase caught and squashed!
- FIXED Untrusted Plug-in Locator One less warning to worry about
- FIXED Kinematic Stiffness Stiffness of kinematic now affects dynamic parent as expected
- FIXED Capsule Length Axis Use the Maya scale manipulator as you'd expect
Jason Snyman
Today I'm happy to announce that Jason Snyman joins Ragdoll Dynamics! 🎉
Jason is a wizard of an animator with 20 years of experience in the industry - from King Kong and Avatar to Game of Thrones - and will be helping you become the best animator you can be, with Ragdoll at your side. That means tutorials, live streams and more of these awesome demos you may already have seen on LinkedIn!
| Batman and Shark | Dragon and Kong | Dragon on Branch |
|---|---|---|
 |
 |
 |
Showcase
You know the drill. Let's get into it. 
Live Stream
We hosted a live stream last Friday! If you couldn't make it, it's been recorded and is made available here. :)

Dragon
Jason's latest animation, using the newly added Fields! Model by Antoine Verney-Carron
Dragon ❤️ Kong
I just can't stop watching this.
Manikin Marine
He's packing!
Tentacle Field
Manikin 3.0
The Manikin has been updated to leverage the new goodies from this release, go ahead and grab it here!
Features
- IK/FK legs
- IK/FK arms
- Anatomical limits
- New compound shapes
- Fully scalable
Fields
Ragdoll now supports all of Maya's native fields.

What are fields?
A field represents a set of forces applied to each Marker. Ranging from Gravity to Turbulence, each field carries unique properties you can use to emulate some environment or environmental effect, like wind and gravity fields along a curve.
What is the difference from regular Maya fields?
They are the very same!
If you're already familiar with them, from e.g. nParticles of nCloth, then you can leverage your experience with Ragdoll, and vice versa if you ever venture into nCloth and friends.
Let's walk through these fields one-by-one!
Turbulence
The perhaps most interesting field. Apply forces in "random" directions, based on the worldspace positions of your Markers.
The way to think of turbulence is as Perlin Noise you may have seen in images such as this.

Where the amount of white determines the amount of force being applied. As a Marker travels across this field, both the magnitude and direction changes in interesting ways.
Drag
Apply an opposite force to any motion.
The faster things move, the greater the force.
Pro tip
This field is similar to Ragdoll's Air Density. Not technically, but practically.
Wind
Apply a uniform force, at a given speed, in a given direction. Like wind, including a kitchen fan with some Spread.
Gravity
A familiar force, except this one can be also be animated!
Newton
Force Markers towards or away from a point in space.
Radial
A more curious field; with a force which increases as it gets farther from the source.
Uniform
Apply a constant force. That's all.
Vortex
Apply forces in a circular pattern.
Volume Axis Field
A field for when you don't know what field you want.
A true Swiss Army Knife of fields, can do everything from Vortex, to Newton to Turbulence in one convenient node.
Volume Curve
Have some fun with this curve-based field. Perhaps to emulate an underwater current?
In this example, I'm also using a Drag field to keep things from flying off into space.
Pro tip
The curve is a normal Maya NURBS curve. If you need more points, right click and add points as you normally would.
Combined Fields
Make two or more fields to combine their effect and create complex forces or series of forces!
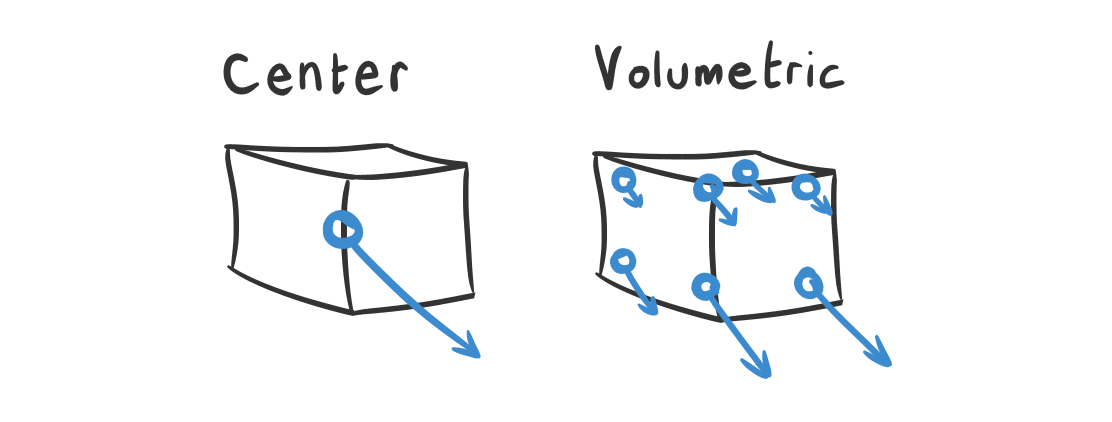
Centroids
Where within each Marker should a field apply forces?
- Center of Mass
- Volumetric
At the center, forces will be nice and predictable; except they won't be able to introduce rotations to your Marker, which may or may not be what you want. For the most realistic fields, use volumetric centroids.
Here's another example using the Turbulence Field.

Which is better?
Up to you! There is a tiny performance penalty for volumetric origins, as the number of forces increase. But you shouldn't notice much if any impact on performance.
Centroid Seed
For complex meshes, centroids can end up in unwanted locations or gather in an area with dense vertices. That's when you can give the algorithm a little jolt to try and see whether there is a better alternative out there.
Use Selected as Source
Some forces act according to their position in the world. Attach a field to a Marker to create an interesting relationship between the two.
Non-commercial Ragdoll
This feature is limited to 100 frames in non-commercial versions of Ragdoll.
Distance constrain two markers, and attach a field to the outer-most Marker for a doubly-interesting effect. That also wrecks your brain. 🙃
Field Scale
If forces start becoming large, you may find yourself in a situation where the visualisation needs to tone down just a bit.
In the solver settings, you will find options to scale those lines (i.e. Field Scale), as well as control how many steps into the future (i.e. Field Iterations) it should draw for you.
Ignore Field
Fine-tune the effect of fields by having one or more Markers ignore the effect of fields.
Force Modes
Fields can apply to your markers in 2 different ways.
| Mode | Description | Math |
|---|---|---|
| Force | Traditional force | mass * distance / time^2 |
| Impulse | Typically used for contacts | mass * distance / time |
Which should I use?
The default is Force, whereas Impulse is what is typically used for collision handling. Experiment, and let us know which you prefer!
Compound Shape
Combine multiple meshes for a complex "compound shape".
Vertices connected by edges are considered an "island", each island is then turned into an independent convex hull. Like this complex endevour.
434 islands in 147 ms
That's how long it took Ragdoll to generate the simulation volumes for the above meshes.
You can slice an dice any mesh to introduce new islands at will, for complete control.
Performance?
If you're wondering what effect this many meshes has on your simulation, the answer is we haven't noticed any. Go crazy, and if you do notice anything, let us know!
Mesh Decomposition
Collision shapes are generated from each individual "island"; that is, groups of vertices that are connected by at least one edge. When you combine two or more meshes together, they will naturally form individal islands.
Sometimes, you'd rather treat the entire mesh as one big shape and for that you can use the Mesh Decomposition = Mesh Islands.
Shape Vertex Limit
Also notice how the vertex limit is applied to each island. Meaning that you can achieve much higher resolution for your collision shapes by cutting things up into pieces!
Quality of Life
Let's brighten up your day, shall we? 🥰
Robust Frame Skips
Anyone playing back their simulation to audio may prefer Ragdoll with a Frameskip Method = Ignore. Such that it'll keep simulating, even though the result won't be 100% reproducible.
But! If you did, you may have ran into this.
Notice how it sometimes fails to keep up with fast time changes? Well, no longer!
Caveat
Like before however, the simulated result you get when frames are skipped will still differ from the result when frames are not skipped, or when different frames get skipped.
The final recorded result will not skip any frames, so you should use this while working but ensure there aren't any frames skipped when you tune and tweak the final values.
Manipulator and HUD
The View Cube and other viewport ornaments are automatically and temporarily hidden whenever you use the Manipulator. But sometimes, Ragdoll could get confused and leave you having to manually re-enable the viewport HUD.
This has now been fixed, and Ragdoll will more predictably re-enable any HUD it hides.
Kinematic Stiffness
Markers set to Kinematic would also lose their stiffness with their parent.
Before
After
This has now been fixed.
Pro tip
To achieve the effect from the previous version, set Pose Stiffness to 0
Untrusted Plugin Location
Users of Maya 2022 would experience this dialog when getting started with Ragdoll.

This has now been fixed.
Negative Scale Edgecase
A rare case was discovered by @BigRoy whereby negatively scaled controllers would yield an incorrect shape drawing. The simulation was fine, but it wasn't looking quite right in the viewport.
Before
After
This has now been fixed!
Import Additions
These attributes were added to the export and import mechanism.
| Nice Name | Long Name |
|---|---|
| World Pose Translate X | driveAbsoluteLinearX |
| World Pose Translate Y | driveAbsoluteLinearY |
| World Pose Translate Z | driveAbsoluteLinearZ |
| Pose Twist Amount | driveAngularAmountTwist |
| Pose Swing Amount | driveAngularAmountSwing |
Capsule Length
All this time, capsules had been scaled in an axis that didn't align with your scale manipulator. 
No longer!
Before
After