2021.07.15
Highlight for this release is improved Rotate Pivot support.
- FIXED Rotate Pivot Now smooth like butter!
- FIXED Re-scale Scaling after making something dynamic
- FIXED Single Joint Shapes Rare edgecase of dynamic solo joints
- FIXED Passive Constraints Another rare edgecase in complex animations now fixed
- FIXED Bake Static Rigids Annoying mistake by Mr. Baker now fixed
- FIXED Unique Names Regression from previous release, squashed!
- ADDED Scene Tolerance Support for mega-tiny and super-massive simulations
- IMPROVED Limit Visualisation Now with colors!
Rotate Pivot
In a previous release support for the .rotatePivot attribute was added. But it was only partial. It only applied to solo rigid bodies, like the one in that example.
Once rigids form a hierarchy, things get more complex, but also more realistic. A lot of character rigs make use of it, some even going as far as to leave NURBS controls at the origin, moving the CVs to where the character is and compensating with the .rotatePivot to make it appear in the right place.
This didn't gel with Ragdoll, who uses the center of a control to determine how to draw chains.
What is this "rotate pivot"?
Just so we're all on the same page, here's me creating a control by moving the rotate pivot and CVs rather than translating/rotating the node.

Notice how I'm not actually moving it to the hip, but rather hold the D-key and move the rotate pivot. Then I'm moving the CVs to where the rotate pivot is to make it both act and appear at the hip.
Why would anyone do this?
Hah! Yes that was my thought too!
As you can see, to make this work you really have to work at it. My guess is this isn't something riggers do by hand but rather via scripting. Done that way, you don't really notice how odd it is.
Either way, there are rigs out there that works like this and it shouldn't limit your use of Ragdoll.
Next, I'll repeat this process for each of my controls.

Pay special attention to how all of my controls are still technically at the origin. Their rotate/translate channels are all zero.
Let's have a look at what the current version of Ragdoll does in this situation.
Before
Notice how nothing appears! That's because Ragdoll tried figuring out where to generate capsules and how large to make them based on the center of each control. But! The controls are all at the origin. They lie there, right on top of each other, with zero distance from each other.
So Ragdoll does what it thinks you want. It generates a series of rigid bodies at the origin with 0 size. When what you really meant was for it to use the center plus this "rotate pivot".
After
This release recognises this, here's what it looks like now.

Win!
Re-scale
Sometimes you're experimenting and aren't quite sure that the scale of an object is what you'd like it to be until you see it in action.
Currently, whenever you make something dynamic it'll use the current scale of the NURBS curve or mesh as part of the collision geometry. But! If you change the size after making it dynamic, Ragdoll won't know about that.
This was especially damning for geometry that needed to be tesselated, namely the Mesh shape type. The most convenient way of refreshing that was to edit the .shapeVertexLimit attribute, forcing a re-tesselation.
That's because Ragdoll cannot know when you resize something. You have to explicitly say you did. That is, until now.

Caveat
It still isn't perfect.
Ragdoll still cannot know when you scale the object. Instead, it queries the current scale on the 1st frame of the simulation, which means it won't actually recognise a new scale until the 2nd playthrough.
That's because once the simulation starts, the initial state is automatically set. Only then can it know that scale has changed, but by then it is too late! Simulation has already begun. So instead, the change is picked up on the next playthrough.
Of course manually setting the initial state (via the Rigging sub-menu) or re-opening the scene will have the same effect so you really shouldn't have to struggle with this in practice.
Scene Tolerance
Ragdoll assumes you're working with human characters in centimeters, meaning a value of 170 means 170 cm and 0.1 cm is a small distance. If that's true, then you typically won't have to worry about "tolerances".
But if you're characters are 17,000 units tall or 0.017 units short odd things start to happen.

Notice how it initially slides around for no apparent reason? In this case, the cube is much smaller than Ragdoll expects and we can address this by decreasing the global scene scale.
Likewise, for very large cubes you will notice similar artifacts. For that, you'd increase the scale.

Currently, there exists a Scene Scale on the solver node, which is saved in your scene, and a Scene Scale in the global preferences which is not. The intention is for global scene scale to rarely change, to change alongside a studio's or project's convention, whereas the solver scene scale is more flexible.
The default value is 10.0 but it's possible smaller values such as 0.1 is better suited. It's also possible they both belong under global preferences. Give this a try and let me know what you think.
Limit Visualisation
There are two kinds of limits; twist and swing.
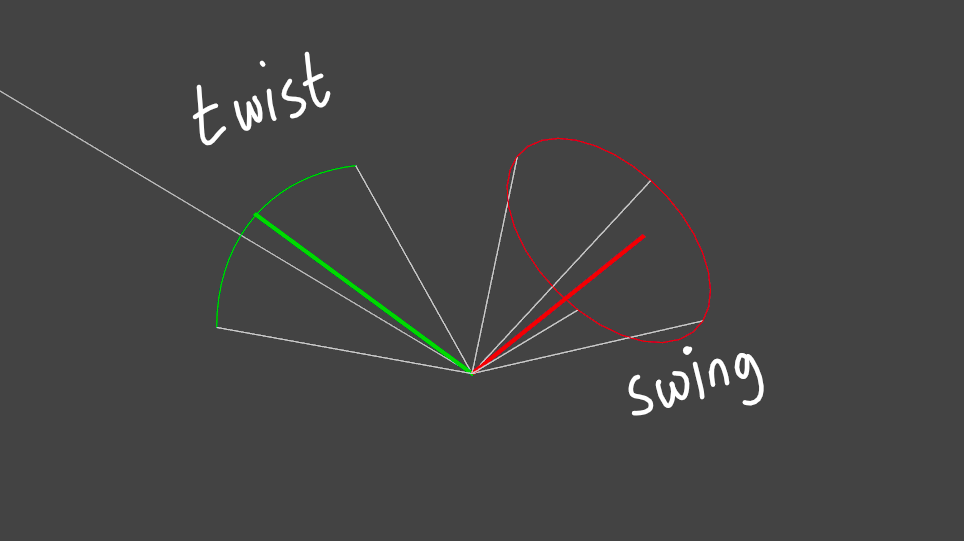
Twist is great for hinge-like limits, like knees and elbows, whereas swing is great for more complex 2D limits like shoulders and hips. The current position of a rigid body in terms of swing and twist have always been drawn as a green/red line, but it could sometimes be hard to know which was which. If the red line starts out in the twist limit, then Ragdoll will promptly snap it back into the swing limit.
This release colors the twist and swing shapes using the same colors as the current twist and swing axes, making it just a tad easier to see which belongs where.
Before

After

Also notice how the twist axis is now confined into the twist shape itself, making it just a bit more clear how close it is to colliding with that limit.
Here's a more complete example of a full set of constraints.

Unique Names
Prior to a recent release, all new nodes generated by Ragdoll was given a unique name. That really shouldn't matter to Maya, as nodes are distinguished by their parent. For the most part. But sometimes not!
For example, cycle warnings produce a message only containing the name of the node itself, not its hierarchy. So you wouldn't be able to tell which of the many rigid nodes were at the root of any cycle by merely looking at this message. And don't get me started on the connection editor. It's perfectly capable of making and breaking connections, but refuses to auto-fill the currently selected nodes if they happen to have the same name as any other node in the scene!
In any case, this has now been fixed and all nodes are once again unique. Automated tests have also been put in place to prevent this slip-up from happening again; but do let me know if you find any duplicates as Ragdoll generates a lot of nodes, and it's possible one may have yet slipped through!
Passive Constraints
Select two rigid to create a constraint.
But if one of those rigids was passive, or even animated between passive and active, and had a different passive animation than the initial state, and your constraint could end up like this.
Before

Especially notice how the passive pose differs from the initial active pose. The active pose was used to compute how to draw the constraint, whereas the passive pose was used during the simulation.
After
This has now been fixed!

Single Joint Shapes
In the rare case of turning solo-joints dynamic, you could end up with results like this.
Before

After
This has now been fixed!

Bake Static Rigids
There was a bug when baking simulation for any rigid what started out passive, e.g. it was hard pinned, but animated active. The Bake Simulation command would mistake these later-simulated rigids as passive, and simply not bake them.
This has now been fixed!